


Back to: Complete Jobman Set-Up Guide for Administrators
Products are combinations of parts and labour that allow you to quote more quickly and accurately.
Please Note: If you have signed up to Jobman as a cabinet-maker, your site will be pre-filled with some products and “quote pricing” materials, which you can use to get quoting right away. The following lessons will assume you are taking this route.
If you have not signed up to Jobman as a cabinet-maker, you will need to add some materials and services to your catalogue before getting started.
Why should I create products?
- Having a ‘core range’ of complete products set up will significantly reduce the amount of time you spend on quoting.
- Products can be created with parametric parts and style items, meaning you can change the product dimensions or material options with one click, and your quote will recalculate the cost for you automatically.
- Products also include labour durations for key manufacturing operations. This will improve the accuracy of your quoting, because your quotes will include materials costs and labour costs.
- Once your customer accepts the quote and a job is created, your products – including materials and labour time – will be transferred to the job, saving you time on data entry and keeping key information accessible to your staff.
Accessing Your Products
To access your products, navigate to Catalogue from the User Menu Panel on the left, then click Products at the top of the screen:

To quickly add and update your products library, you can export it and then import it, following these steps:
Export Your Products
- From the User Menu Panel, navigate to Catalogue > Products > Export:

- Click Create:

- Click Create again:

- Once the export is complete, Download your new CSV file:

Updating the CSV Template
Once you’ve downloaded the CSV template, you will need to update it with your product information:
- Either copy-and-paste or type in your product names, types, SKUs, parametrics, pricing and pricing strategy.
- If you haven’t set up operations in Jobman already, proceed to step 4.
- If you have set up operations, you can fill in the columns in your CSV with the relevant operation times.
- Save your CSV file and you’re ready to import!
Please Note: DO NOT fill out the ID column. This will auto-generate when you import the CSV.
Pricing Strategy: Fixed Pricing vs Variable Pricing
- Fixed Pricing: Allows you to set a required sell price for this product, which will be applied automatically when you add the product to a quote.
- Variable Pricing: We recommended choosing Variable Pricing if assigning parts or components to your products. This will mean that when linked materials or components are updated (including pricing), your products will be updated also.
Import Your Products
To import your completed CSV file, follow these steps:
- Go to Catalogue > Products > Import > Create as before.
- Click Upload, or drag-and-drop your CSV into the File field (see below).
- If you have entered product types into your CSV file that are not currently set up in your Jobman software, tick the box Add new Product Type if not found, and these will be added to your software during the import.
- Click Create.
You’ll be redirected to an import summary which will either let you know your import was successful, or list any errors that have caused the import to fail.

After you’ve imported your products, create components and parts to populate the remaining data inside each product.
Manually Creating a New Product
To create a new product, follow these steps:
- Go to Catalogue > Products, then click Create.
- Name your product.
- Enter the SKU/Product Code if you have one.
- Enter the Barcode if required.
- Choose a Product Type (e.g. “Base Cabinet”, “Counter Top”).
- Add your product Dimensions if known.
- Choose a Pricing Strategy (see below).
- Click Create again.
You’ll be redirected to a summary page showing your product information.
Examples:
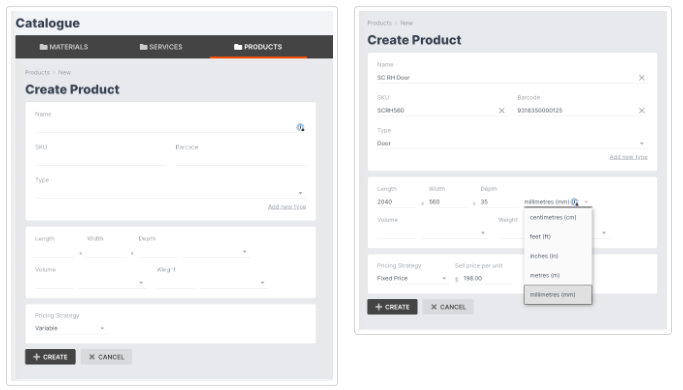
Tip: When entering product dimensions, use the most common size your product is made in. You can always adjust dimensions for individual products inside a quote.
Copying Products
Use the Copy function when you need to set up two or more similar products, rather than having to create them again from scratch.
Simply click into the product you want to copy, click the three-dot menu at the top left, then click Copy:

A pop-up will appear and ask you to confirm. Click Copy again, and you will be redirected to your new product summary, where you can add or remove parts or make any other changes needed.
Tip: Your new product will be called “[Product Name] Copy”, so that you know you are editing the correct product. Edit the name at any time by clicking Update.
Adding Parts to a Product
Once you’ve created a product, it’s time to add product parts. You can do this by following these steps:
- Click Add a new part:

- Choose a part Type (see Part Types and Measurements Explained).
- Fill in any other details for your part (this will depend on the Type).
- Click Create.
You will be taken back to the product summary, where you will now see your part added. You can click into the Name, Quantity or Type fields to edit the part further.
Repeat steps 1-4 until you have added all your parts.
Part Types and Measurements Explained:
- Item: Manually enter an item and a fixed price for a part of your product that is not set up in your catalogue.
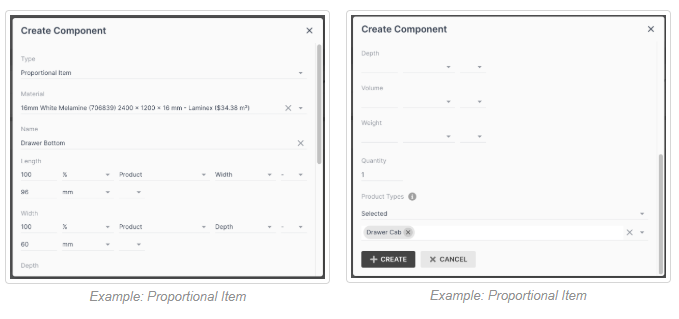
- Proportional Item: Add a required material and then apply a parametric measurement for selected properties for this item (e.g. length, width, depth, volume, or weight).The pricing of the proportional item will then change according to the material price multiplied by the part size when you add your product to a quote.
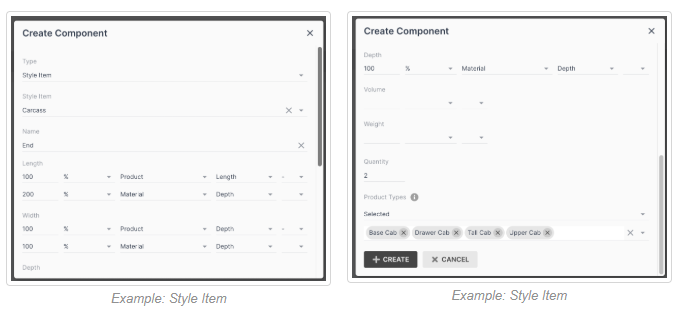
- Style Item: Use for parts that have more than one range option. For example, the product might be a drawer, and the style item might be “handles”. You might use cheaper or more expensive handles across different quotes. Setting the handle as a style item allows you to easily select the option you want for each quote.
Some style items are also proportional (for example, benchtops), and will require parametric measurements. - Material: Add a specific material from your catalogue.
- Labour: Add the operation(s) required to manufacture this product, enter the duration, and click Create. Once the labour is added as a part, your quote price will adjust based on the product size and required labour time.
- Service: Add a service that may be required from an external provider, such as painting, cleaning, delivery, etc.
Part Dimensions Explained:
Please note: It is essential to add your labour as a product part, because this allows you to assign the product against the required operation once your quote is accepted and turned into a job.
Examples:

Updating a Product Part
To update an existing part, simply click on the part name inside your product. An Edit window will open, into which you can enter any changes required. Click Save Changes to finish.

Creating Product Components
Create product components to easily build and modify your products.
What Are Product Components?
Components are product parts that are common to many different products, although they may vary in size and other specifications.
Example: A “Base 1 Door Cabinet” has 2 ends, 1 top, 1 shelf, 1 cabinet door, 2 hinges, 4 legs, and 1 handle. These can all be components, because most cabinet-type products will include these parts.
Think of components as “global” or “shared” product parts. For example, if you have 3 products and each product has a “top”. If you add the “top” part to each product individually, then if you need to make changes to the “top”, you would need to go into all 3 products and edit the parts individually.
Whereas, if you set the “top” up as a component and add the component to all 3 products, you would only need to edit the “top” component, and the change would automatically be applied to all 3 products.
Note: Be careful when creating a component, because it will automatically be added to any existing products that match the selected product type(s). If you’re experimenting with a new component, it’s best to set the product type to “None” and manually add the component to one or more existing products:

How to Create Product Components
To create product components, follow these steps:
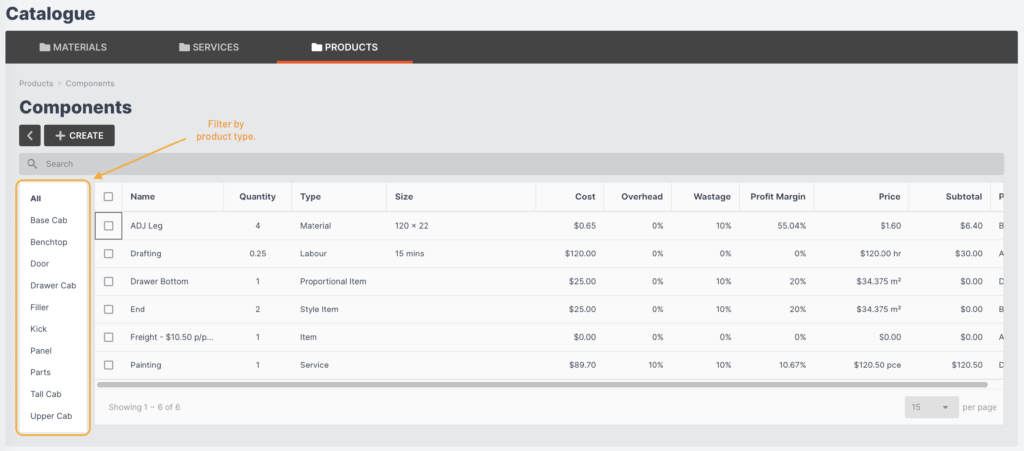
- From the User Menu Panel, navigate to Catalogue > Products > Components:

- Click Create:

- Choose a component Type from the drop-down. (Note: component types are the same as product part types.)
- Enter any other details (these will vary based on the component type).
- Enter the required quantity.
- Select which Product Types this component will apply to.
- Click Create again.


Once you’ve built your components, you can easily modify them at any time, and your changes will be automatically applied to all relevant products in your catalogue.