


Back to: Complete Jobman Set-Up Guide for Administrators
Easily apply your styles and ranges to a whole quote or to individual sections. Create your products and update your styles to suit individual clients or customer needs. Create ranges based on quality and price, such as “Premium Range,” “Mid Range” or “Basic Range,” for quicker and easier quoting.
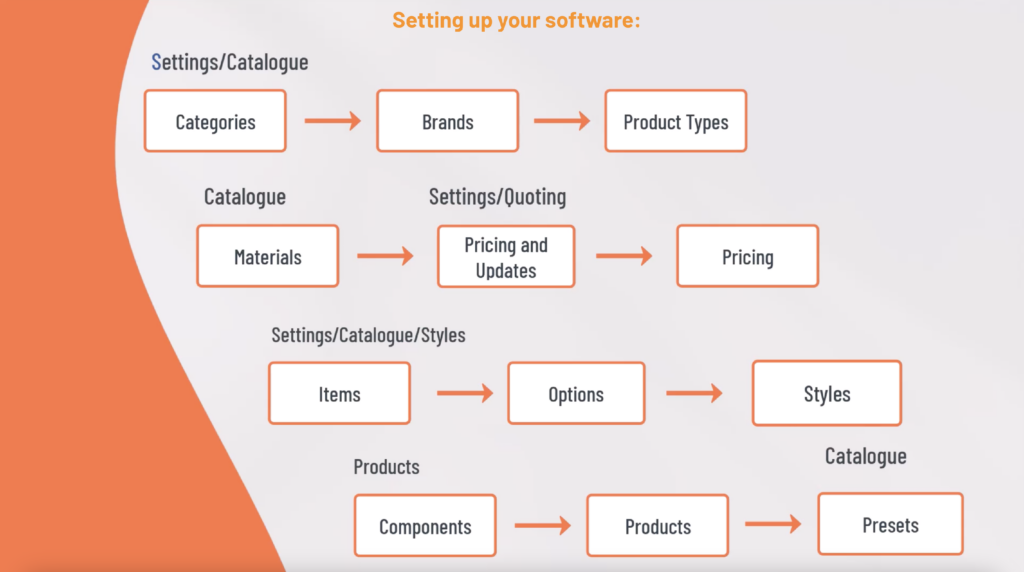
To set up your styles, you need to follow the below steps in order:
Step 1 – Create Items
- Go to Settings > Catalogue > Styles > Items.

- Click Create.

- Name your item (e.g. “Door”).
- Click Create again.
You can click into an existing item at any time to edit or delete it.
Tip: Make sure to set up all items needed for a style before moving to the next step.
Step 2 – Create Options
- Go to Settings > Catalogue > Styles > Options.

- Click Create.

- Name your option (e.g. “Door -16mm Natural PFB”).
- Under Items, choose All or Selected.
- If you choose Selected, an drop-down menu with all your items will appear. Click on each item that you want your option to apply to.
- Finally, choose the corresponding Material from your catalogue and click Create.

Note: We recommend that the materials used in an option are set up as the brand “Quote Pricing” in your catalogue. Some materials may have a range of different options in either colour or size. Generally the colour won’t change the price – however, material size will. Use lead item specifications to list these particulars in a quote, rather than setting up multiple styles with the same price.
Learn more about Quote Pricing later in this lesson.
Step 3 – Create Styles
- Go to Settings > Catalogue > Styles.
- Click Create.

- Name your style (e.g. “Deluxe Range”). Note: This name will appear on your quotes when used.
- Using the drop-down menu next to each item, apply an option.

- Click Create again.
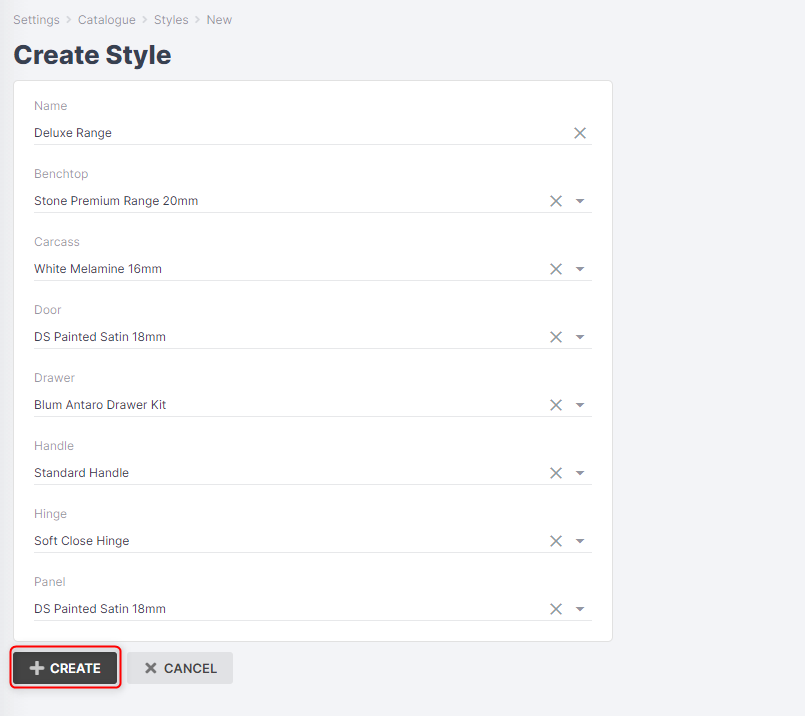
You will be shown a summary of your style and all its designated items and options.
When you apply a style to a quote, the items and prices associated with that style will be shown in that quote.
Quote Pricing & Optimisation Explained
Quote Pricing is used to map style ranges.
Quote Pricing items are set up not to purchase order from a supplier – they are ‘generic range options’ that are only used for quoting. Link your relating substitute materials so once your job is won, you can select the actual material to be ordered from [Job #] > Resources > Materials.
Example: Quote Pricing range Carcass Board = 16mm White Melamine, this is a non-orderable material but covers the range pricing for parametric products. Substitute = the exact white board ordered from your supplier as shown below.

Optimisation: this can be set up for materials using the brand “Quote Pricing”. It can be either square meter or lineal meter rate.
This will tell the software when quoting how best to round the total parametric of all products in the quote (only relevant for sheet pricing or lineal meter items, not used for hardware etc).
Example: 25.6 sheets on quote, Jobman will make this 26 sheets for purchase ordering.

Please note: Any material or product set up with quote pricing will need to have the status set to “Not Available to Order”.
Preferred Catalogue Items: Next to the Update button you will also see a Set as Preferred option. Use this function to make this the preferred material that comes from suppliers when choosing substitutes for your quote pricing items.

Proportional Products and Components Explained
If you want to create products in Jobman that can use proportional parts and style ranges for fast quoting, you need to understand how to set this up correctly. You will first need to be familiar with quote pricing, style items, parts, and components.

Inside products you can assign parts.
You can link these parts to style items that use a material based on a SQM rate.
When Jobman calculates the total cost of the product, it takes into consideration the whole SQM rate of all the parts combined.
This also works for lineal metre calculations.
Please note this is not in an optimised format as we are not a nesting tool.
Example: Base 1 Door Cabinet
Parts of the cabinet are linked to a style called “Carcass”. These parts are linked to a board material which is optimised to be based on SQM. In a quote, this will multiply the total parts (SQM) by the total area to obtain the price. The same methodology can be used for steel, signs, surface area, etc.


Restricting Product Parts and Components to Style Options
You can set up product parts or components that only get added to quotes when specific style options are applied to the product.
For example, let’s say you have a product that requires 20 minutes of the operation “Painting”. You can create a labour part, and the labour will be factored into the cost when the product is added to a quote. However, you may only need to paint this particular product when certain conditions are met, such as when a specific material is used.
To prevent this 20 minutes of labour being incorporated into the product’s cost when it’s not necessary, you can “restrict” the part to only apply if one of the style options “Category A Paint” or “Category B Paint” are selected.
To restrict a part to style options, simply create (or edit an existing) part or component and change Restrict to Style Options from All to Selected, then choose the relevant style options you want the part to be applied to.

When you add this product to a quote, by default this part/component will not be displayed or included in the calculations for the product, unless one of the style options has been applied.
Note: When viewing a product in your catalogue, the calculated values (cost/overhead/wastage etc.) will only include parts with Restrict to Style Options set to “All.” This means that products with style options selected may be significantly more expensive in a quote than in your catalogue listing.
Additionally, if you don’t want a part to be added to a quote in any circumstance, you can change “Restrict to Style Options” to “None”. This can be useful for creating “Draft” parts.