Back to: Complete Jobman Set-Up Guide for Administrators
Once you have created your leads, jobs, and quotes, you will need to start invoicing your customers for the work done.
Revision: Invoice Types and Statuses
You will have set up your invoice types and invoice statuses when you configured Jobman to match your accounting software. However, you may want a refresher on what invoice types and statuses do, and how to create and edit them if needed.
Invoice Types:
Depending on your accounting platform, you will have at least two invoice types: “invoice” and “bill”.
- Invoices are receivable: that is, paid to you by your customers.
- Bills are payable: that is, paid to your suppliers by you.
You may have more than one type of receivable invoice, e.g. “deposit invoice”, “partial invoice”, “full invoice”.
We strongly recommend that you only create a new invoice type if you have an existing type in your accounting software that does not currently appear in Jobman.
Creating a New Invoice Type:
- From the User Menu Panel, navigate to Settings > Accounting > Invoice Types.
- Click Create.
- Enter the name of your invoice type.
- Enter the code – this MUST match exactly with your accounting software.
- Under classification, choose either Payable or Receivable.
- Choose the appropriate account from the drop-down.
- Click Create again.
You can click into an existing invoice type at any time to Update or Delete it, but be very careful when doing so, as this can create problems between your Jobman and your accounting software.
Invoice Statuses:
Depending on your accounting software, you will have at least two invoice statuses: “open” and “closed”; or “awaiting payment” and “paid”, etc.
You should only have invoice statuses in Jobman that match the statuses in your accounting software. Any statuses in Jobman that do not appear in your accounting software should be deleted.
Creating a New Invoice Status:
- From the User Menu Panel, navigate to Settings > Accounting > Invoice Statuses.
- Click Create.
- Enter the name of your invoice status.
- Enter the code – this MUST match exactly with your accounting software.
Xero invoice status codes: DRAFT, SUBMITTED, DELETED, AUTHORISED, PAID, VOIDED.
MYOB invoice status codes: Open, Closed, Credit. - Tick the checkboxes that apply to the status.
For example: “Draft” status should have Can be updated and Can be submitted ticked. - Click Create again.
We recommend setting “Draft” as your default invoice status, so that all invoices will be set to this status when you create them.
You can click into an existing invoice status at any time to Update or Delete it, but be very careful when doing so, as this can create problems between your Jobman and your accounting software.
How to Create and Edit Invoice Templates
You can create and customise invoice templates, to keep your branding consistent.
To create a new invoice template, follow these steps:
- From the User Menu Panel, navigate to Settings > Templates and click Create.
- Name your template.
- From the Type drop-down, select Invoice.
- Click Create again.
Please note: Creating a new invoice template or any template will load the latest version from our system. This will include updates or fixes.
To edit an existing invoice template, follow these steps:
- From the User Menu Panel, navigate to Settings > Templates.
- Select Invoice from the menu on the left, then click into the specific invoice template you want to edit.
- Click Update. You will be taken to the HTML version of your template.
- Update the template name if required, along with the subject.
- Make any updates to the body text required, including adding any of the template variables listed next to the code.
Please note: The body of the template will contain predefined HTML variables. You can adjust these and add more variables and text where required. To add an additional sentences to the template body, you will use the HTML variables at the start and end of the sentence as per the image below.
- Once you’ve made your changes, click Preview.
- Once you’re happy with the new template, click Save Changes.
To customise your templates further, we suggest you reach out to a HTML specialist, or one of our Jobman Certified Implementation Partners.
Copying or Deleting an Invoice Template
Go to Settings > Templates, select the template you want, and either click Copy to make a duplicate which you can then edit, or click Delete.
Setting a Default Invoice Template
To set an invoice template as your default for when a new invoice is created, go to Settings > Templates, select the template you want, then click Set as Default.
Creating an Invoice
To create a new invoice, follow these steps:
- From the User Menu Panel, navigate to Invoices and click Create:

Note: You can also create invoices from leads, quotes, or jobs (explained later in this lesson). - Choose your contact (client or supplier) from the drop-down menu or start to type the contact name. If they have not been added yet, click Add a New Contact to create.
- Choose the invoice type (e.g. deposit invoice, full invoice, bill) from the drop-down.
- (Optional) Enter a reference, e.g. PO number.
- Click Create.
You will be redirected to the newly created invoice, where you will see the following:
- Invoice number, status, and type
- Reference, date of issue, due date, and your chosen invoice template
- Add New button
- Invoice preview

You can change the status by clicking the orange button (“Draft” in the example above), or you can change the type by clicking the grey button (“Bills” in the example above).
Please note: Jobman will automatically assign an invoice number to newly created invoices (i.e: JMINV-0061). This invoice number will be replaced with the number in your accounting software once you have synced the invoice from Jobman.
Please note: Only invoices in draft status can be edited.
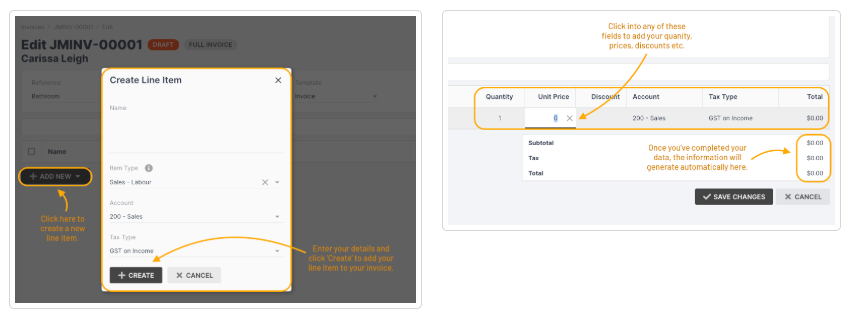
Adding Invoice Items and Editing Invoices
Click Add New to add a Line Item, Invoice Subtraction, or Quote to your invoice:

When adding a line item, a pop-up will appear for you to add the following:
- Name of the product or service
- Invoice Item Type (only applicable if you have synced Jobman with QuickBooks Online)
- Account
- Tax Type
When you have entered all the information, click Create.
When adding an invoice subtraction, you will be shown a list of previous invoices sent to this contact:

Select an invoice to subtract. The amount from the selected invoice will be subtracted from the total of your current invoice.
When adding a quote, you will be shown a list of quotes accepted by this contact. (Note: only quotes in the accepted status can be invoiced.)
Select a quote, and its value will be added to the invoice.
Once you have added your items to the invoice, you can click into any of the item fields (e.g. Quantity, Unit Price, Discount, etc.) to edit them.
Finally, Preview and/or Save Changes to your invoice.
Once you Save Changes, your invoice will be saved in Draft status.
As long as your invoice remains in Draft status, you can edit it any time by clicking into the invoice and clicking Update at the top.
Syncing and Sending Invoices
If your invoice is in Draft status, you will see the option to Submit the invoice, alongside the Update and PDF options:

Click Submit to sync the invoice to your accounting software.
Please Note: Invoices in your accounting software prior to integrating with Jobman will not appear in your Jobman software after connecting.
Similarly, invoices created in Jobman will not appear in your accounting software until you submit them. You MUST click “Submit” to sync your invoice. You CANNOT sync your invoice by manually changing the invoice status, e.g. to “Awaiting Payment”.
Once submitted, Jobman will attempt to create the invoice in your accounting software, where you will be able to approve and send to the contact.
When the invoice has successfully been submitted, Jobman will reflect any subsequent changes made to the invoice in your accounting software, including any payments recorded.
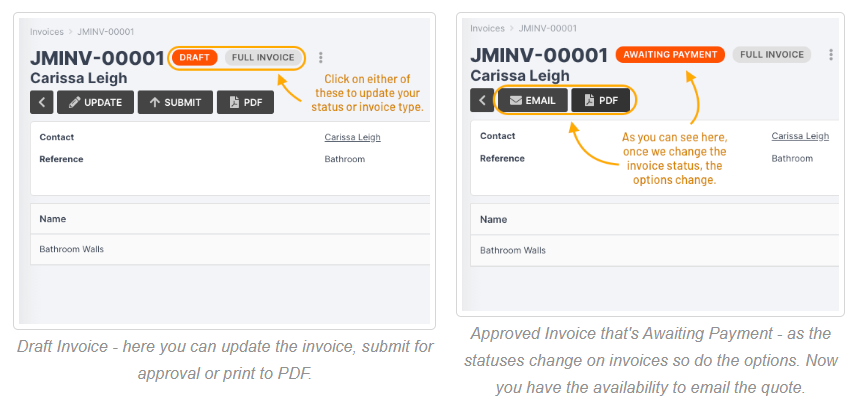
Sending Invoices via Jobman:
In order to be able to send invoices from Jobman, the invoice must be in a status that can be sent, and the user must have the permission “Can send invoices” enabled for their role.
Each invoice status will allow you to perform different actions.
For example, if an invoice is in the Awaiting Approval status, you will see an Approve button at the top of the invoice.
Creating an Invoice from a Lead
Create an invoice from a lead with an accepted quote by following these steps:
- From your lead, click New > Invoice.

- You will be taken to a blank invoice. Click Add New > Quote.

- Choose your accepted quote from the drop-down and click Create.
- Choose your Invoice Type, e.g. Deposit Invoice, Full Invoice, etc.
- Select Group items into a single line if you want to roll all quote items into one line per tax type.
Example: All items with the tax type GST on Income will show in one line, and all items with BAS Excluded will show in another line. - Select the quote items you want to invoice.
- If you’ve selected partial or deposit invoice, you can enter the percentage you would like to invoice, which can be changed for each quote item.
- Enter the percentage or deposit amount you would like to charge under Percentage – this will apply to all selected Quote Items as shown below:

9. Finally, click Create.
You will be taken to the newly created invoice. Its status will be Draft.
Creating an Invoice from a Quote
Create an invoice from an accepted quote by following the steps below.
Note: The quote must be in a status that can be invoiced, e.g. Quote Accepted.
- From the User Menu Panel on the left, navigate to Quotes.
- Use the filter or search function to find the quote you want (see below).

3. Click into the quote you want, and up the top you’ll see options to Revise, Email, Print PDF, or Invoice.

4. Click Invoice.
5. Choose your Invoice Type, e.g. Deposit Invoice, Full Invoice, etc.
6. Select Group items into a single line if you want to roll all quote items into one line per tax type.
Example: All items with the tax type GST on Income will show in one line & all items with BAS Excluded will show in another line.
7. Select the quote items you want to invoice.
8. If you’ve selected partial or deposit invoice, you can enter the percentage you would like to invoice, which can be changed for each quote item.
9. Enter the percentage or deposit amount you would like to charge under Percentage – this will apply to all selected Quote Items as shown below:
10. Finally, click Create.
You will be taken to the newly created invoice. Its status will be Draft.
Creating an Invoice from a Job
Create an invoice from a job by following these steps:
- From your job, click New > Invoice:

- Select an invoice type, enter a reference if needed, and click Create.
- You will be taken to a blank invoice, where you can add a quote and quote items as above, or manually add individual line items and amounts.
- Click Save Changes.
Need to update your invoice?
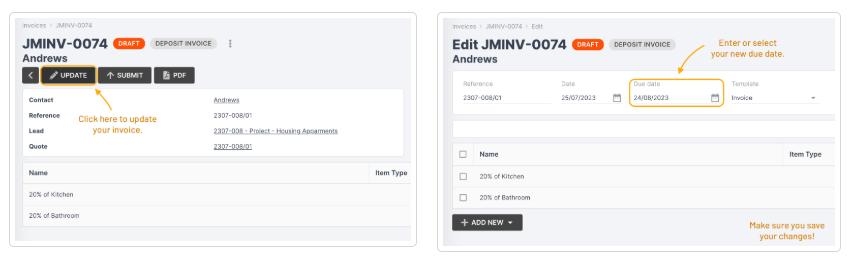
Check the details of your invoice – for example, the due date. If any changes are required, simply click Update, make your edits, and Save Changes.
Tip: Set default percentages for your invoices by going to Settings > Accounting > Invoice Types.
Invoice Percentage Warnings:

Invoice Numbers are automatically generated by Jobman. Once the invoice syncs with your accounting software, it will be automatically overridden with the accounting software’s invoice number.
We recommend that you wait for your accounting software to sync before emailing or printing your invoice, so that the client is not issued an invoice with the incorrect number.
If you need to update an invoice, its status must first be changed back to Draft.
To change the status of an invoice, simply click on its current status at the top left:

Did you know? If your accounting software is connected to Jobman, any invoices paid by clients will automatically update to the Paid status in Jobman.
How to Change Due Dates for Invoices and Bills
nce you have set up your payment terms, your invoices and bills will automatically set to your default due date when they are created. However, you may need to change the due date on an individual bill or invoice, in which case you will need to follow these steps:
- Click into the invoice or bill you need to edit, either from the Invoices tab or from a Lead, Job, etc.
- Click Update.
- In the Due Date field, type a new date or select one from the calendar.
- Click Save Changes.
Now you can submit or re-issue your document with the amended due date.