Skip to content
Jobman AcademyJobman Academy
  • Academy
  • My Account
Jobman AcademyJobman Academy
  • Academy
  • My Account

How to Create and Use Job Alerts

Home » How to Create and Use Job Alerts
Breadcrumb Abstract Shape

How to Create and Use Job Alerts

  • February 21, 2025
  • Com 0

Back to: Complete Jobman Set-Up Guide for Administrators

0

Job alerts allow your team to communicate when things go wrong or when an important process needs to be followed. When a job alert is created, all assigned staff members will receive a notification with a link to the alert.

For example: Damaged part – An alert can be triggered by the team to let management know that a work order will need to be created so this can be rectified.

Tip: You will need to be connected to your cloud file storage before you can upload, view, or share files and photos related to job alerts.

Roles & Permissions: If you are unable to view or add job alerts, please check your staff role permissions under job alerts and kiosk.

Setting Up Job Alert Statuses

Define job alert statuses to track the progress and resolution of your job alerts.

Example: Reported (default), Assigned, Actioned & Completed.
  1. Go to Settings > Jobs > Alert Statuses.
  2. Click Create.
  3. Name your status.
  4. Click Create again.

You can click into an existing status from the list at any time to rename it or set it as the Default status.

Setting Up Job Alert Types

Use job alert types to categorise your alerts and guide your team in how to use and respond to them.

Example Alert Types: Damaged Stock, Drafted Incorrectly, Installer Damage, Job Incomplete, Machine Maintenance, Material Defect, Operator Error, Site Damage, Incident/Accident Report or Near Miss.

  1. Go to Settings > Jobs > Alert Types.
  2. Click Create.
  3. Name your alert type.
  4. Choose Responsible staff from the drop-down.
  5. Fill out template information.
  6. Choose relevant job types from drop-down.
  7. Click Create again.
Example: Damaged Part.

Creating a Job Alert (Office Users)

  1. From the User Menu Panel, navigate to Job Alerts.
  2. Click Create.
  3. Jobman will automatically generate the time, date, reported by and status for your alert.
  4. Choose an alert type from the drop-down.
  5. Assign to a job number (if relevant).
  6. Assign to specific management members if necessary.
  7. Upload any relevant files or photos.

Creating a Job Alert (Kiosk Users)

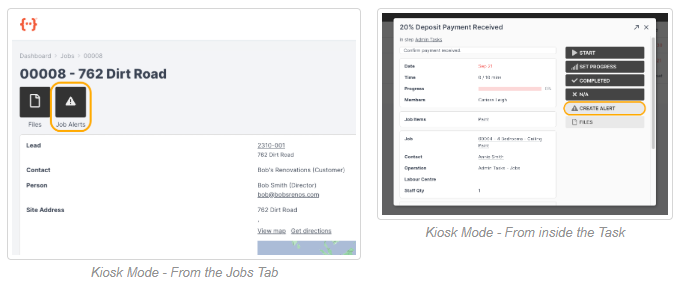
There are two ways to raise an alert when in Kiosk mode: you can click into the job, or you can click into the task (see image on the right below).

  1. From the Kiosk Dashboard, click Jobs.
  2. Click into the job you want to raise an alert for.
  3. Click Job Alerts.
  4. Click Create.
  5. Choose the alert type.
  6. Update the Notes field if required.
  7. Upload files if required.
  8. Click Create again.


Previous Lesson
Quote Summary Report
Lesson 9 within section Reporting.
Next Lesson
How to Create and Use Job Forms
Lesson 2 within section Job Alerts and Forms.

Course Syllabus

  • General Navigation and Usability
    • General Navigation
    • User Control and User Settings
    • User Licenses and Staff Types
    • Staff Roles and Permissions
  • Getting Started
    • Connect to Your Cloud File Storage
    • Connect to Your Accounting Software
    • Setting Up Your Staff
    • Setting Up and Managing Staff Login Details
  • CRM Management
    • How to Add Contacts
    • How to Manage Contacts
    • Contact Types, Roles, and Sources
    • Contact Emails and Resources
  • Lead Management
    • What is a Lead?
    • How to Create a Lead Workflow
    • How to Create a Sales Labour Centre
    • How to Create an Agenda Screen for Your Sales Team
    • Lead Settings: Types and Statuses
    • Lead Settings: Details
    • Lead Settings: Members and Member Types
    • Create Lead Item Types and Specifications
    • Automated Triggers in Lead Workflows
    • How to Create a Lead
    • How to Manage and Edit a Lead
  • Job Management
    • How to Create a Job Workflow
    • Automated Triggers in Job Workflows 
    • Job Settings: Types, Statuses, Details, and Members
    • How to Create Labour Centres for Your Jobs
    • How to Create Agenda Screens for Your Jobs and Staff
    • Understanding Your Capacity
    • How to Create a Job
    • How to Manage and Edit a Job
    • How to Create a Work Order from a Job
    • How to Use Your Target Calendar
  • Kiosk
    • How to Set Up Kiosk Staff Working Hours
    • Overview of Kiosk Mode Functions
    • How to Create Agenda Screens for Your Kiosk Staff
    • Staff Member Types and Automated Task Allocation
    • How to Create Activity Screens for Your Staff
  • Quoting
    • The Four Levels of a Jobman Quote
    • How to Build Products
    • How to Create Styles and Range Options
    • How to Build Quote Presets
    • Quote Templates
    • Quote Statuses
    • How to Create and Send a Quote
    • How to Refresh Quote Pricing
    • How to Copy and Revise Quotes
    • How to Create, Send, and Sync Invoices
  • Catalogue Management and Inventory
    • Catalogue Settings
    • Setting Prices and Measurements for Catalogue Materials
    • How to Create and Import Catalogue Materials
    • How to Create Catalogue Services
    • How to Add and Manage Inventory Items (Stock)
    • Price Matrices
  • Purchase Ordering and Inventory Picking
    • How to Create Purchase Order Statuses
    • Managing Job Resource Materials
    • How to Create and Send Purchase Orders
    • How to Manage, Edit, and Receive Purchase Orders
    • Picking List and Inventory
    • How to Set Up Minimum Stock Quantities for Purchase Ordering
    • Supplier Integration – Hafele
    • Supplier Integration – Wilson & Bradley
  • Reporting
    • Reports in Jobman
    • Quote Summary Report
  • Job Alerts and Forms
    • How to Create and Use Job Alerts
    • How to Create and Use Job Forms
  • Payroll Set-Up and Time & Attendance
    • How to Set Up Staff Pay Rates
    • How to Log Staff Time and Attendance
    • How to Log Staff Leave, Public Holidays, and Temporary Business Shutdowns
  • CAD/CAM Integration
    • How to Connect Your CAD/CAM Software
    • Cabinet Vision
    • Mozaik
    • Microvellum
    • Winner Flex
Copyright 2025 Jobman Pty Ltd. All rights reserved.
Jobman AcademyJobman Academy
Sign inSign up

Sign in

Don’t have an account? Sign up
Lost your password?

Sign up

Already have an account? Sign in