


Back to: Complete Jobman Set-Up Guide for Administrators
Once you have created your staff members in Jobman, you need to give each person in your company the ability to log in. This lesson contains important information regarding setting up, managing, and/or removing staff login details.
Definitions of Terms
- Staff / Staff Profile – A representation of a staff member in your organisation, and their personal details. When you invite someone to log in as a staff member, you are inviting them to attach their user to that staff profile.
- User – The details attached to the unique email and password that you use to log in to Jobman.
- You can have one user that is connected to two or more staff profiles across separate organisations.
- You CANNOT have one user that is connected to two or more staff profiles within the same organisation.
- Log in – The action of authenticating, or the ability to authenticate with Jobman, using an email and password.
- User email – The email address that is associated with your user. When you accept an invitation to log in for the first time, the email address that you enter becomes your user email.
- Staff email – The email address that is associated with your staff profile. This is set for you by your manager.
- Two or more users cannot share the same user email.
- Two or more users cannot share the same staff profile.
- However, two or more users can share the same staff email.
Example: You have two people in your accounts team, Sally and Fred. Sally’s user email is “sally@gmail.com”, and Fred’s user email is “fred@yahoo.com”. Sally has her own staff profile, and Fred has his own staff profile. However, both their staff profiles may have the staff email “accounts@company.com”.
Your user and user email are used to access Jobman. Once you have logged into Jobman, your staff profile and staff email are used for all interactions and communications that you send and receive from Jobman.
Example: Joe has been hired by Company X as a drafter. When invited to log in for the first time, he enters his personal email address, “joe@gmail.com”. This becomes his user email. However, Joe’s staff email is “joe@companyx.com”, and this is what your staff and customers will see when he sends and receives emails from Jobman.
- Invitation – A unique link sent via email to the email address listed on the staff profile, which allows (for a short period of time) any user to attach their user to that staff profile.Example: If your invitation has been sent to “sales@businessx.com”, and you accept the invitation and login with the email address “bill@gmail.com”, your user email “bill@gmail.com” will be attached to the staff profile which contains the staff email “accounts@businessx.com”.
- Kiosk PIN – A four-digit password used to access the Kiosk, which can be assigned to either an office user or a kiosk user.
- Revoke – The act of detaching a user login from a staff profile. Once a user has had their login revoked, they cannot login to Jobman any more.
- Deactivate – A temporary removal of access for a staff member. A deactivated staff member will still have their user login details, but if they try to log in, they will see a message: “Your staff profile has been deactivated,” and they will be unable to see your Jobman software or take any actions inside it.A deactivated staff profile will not be visible anywhere in Jobman, except in Staff > Deleted or in historical activity logs. Deactivation is not permanent: you can reactivate a staff profile any time, and the user attached to it will then be able to log in as normal, provided you have not revoked their login.
How to Set Up an Office User
- From the User Menu Panel, navigate to Staff.
- Either add a staff member or click on an existing one. Note: They must have an email address added to their profile.
- Click Invite to Log In (see below).
- A confirmation box will pop-up and ask you to confirm. Click Send.
An email will be sent to the staff member with a link to log in, and they will be prompted to set a new password.

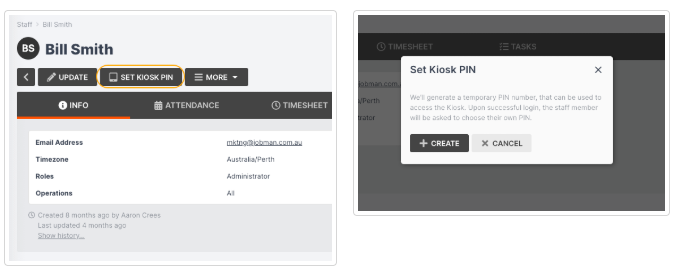
How to Set Up a Kiosk User
- From the User Menu Panel on the left, navigate to Staff.
- Click into the staff member you want.
- Click Set Kiosk PIN at the top of the screen.
- A pop-up will appear and advise you that a temporary PIN will be generated. Click Create.
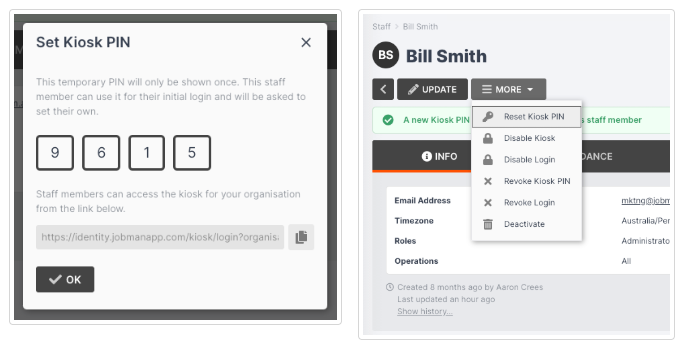
- You will be shown the temporary PIN and a link for the staff member to log in to the Kiosk.
- Copy the link and the temporary PIN and email these to your staff member, then click OK to exit the dialogue.
- When your staff member follows the link and enters the temporary PIN, they will be immediately prompted to set a new PIN.
You can reset, revoke, or disable a staff member’s PIN by clicking into their profile from the Staff tab and then clicking More.
How to Limit or Temporarily Remove Staff Access
If a staff member is going away for a short period and you do not want them to have access to your Jobman software, or if you want to downgrade a staff member from office user to kiosk user, follow these steps:
- Go to Staff.
- Click on the staff member.
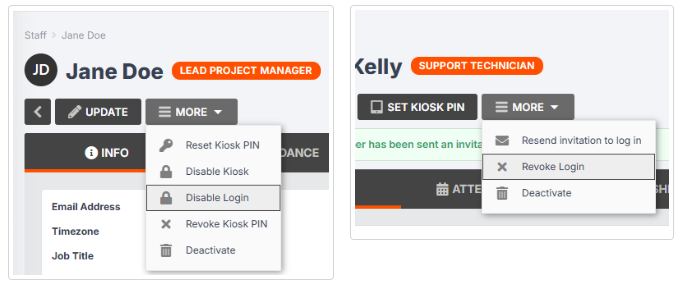
- Click More. If the staff member has a Kiosk PIN, you will see an option called Disable Login. If the staff member does not have a Kiosk PIN, you will see an option called Revoke Login. Click on whichever of these two options appears for your staff member:
- This will revoke the staff member’s login.
- Click Set Kiosk PIN if the staff member will still need Kiosk access and does not already have a PIN.
Managing Staff Changeover
When a staff member leaves your company or moves to a new position, and a new employee must be set up to fill the vacant role, it is very important that you follow these steps.
IMPORTANT: Failure to follow these steps can often cause serious difficulties for the new employee in logging in, and can create unwanted links between users, staff profiles and email addresses, which are difficult to resolve.
- Go to Staff.
- Click on the staff member who is being replaced. If they are staying in your company but entering a new position, simply click Update and enter their new job title, role(s), operations, etc., as necessary.

Then skip to step 7.
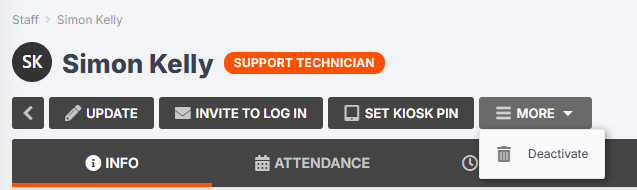
3. If the staff member is leaving your company, click More:
4. If the staff member is a kiosk user only, click Revoke Kiosk PIN. If the staff member is an office user only, click Revoke Login. If the staff member has access to both office and kiosk mode, click Revoke Kiosk PIN and Disable Login.
5. Once you have revoked access, click More > Deactivate:
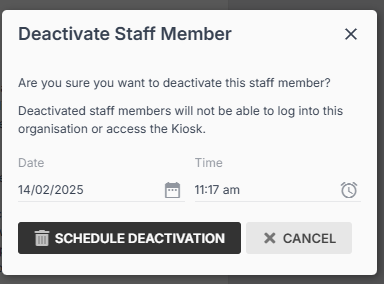
6. A pop-up will appear and ask you to confirm deactivation. Enter a time and date if necessary, then click Schedule Deactivation:
7. Go back to Staff.
8. Click Create, and set up a new staff profile for the person who will be starting at your company in the vacant role. Then either set them up as a kiosk user or office user depending on what is required.
IMPORTANT:
- Do not attempt to transfer an existing staff profile to a new user. If you need the new user to have an existing staff email, e.g. “accounts@businessx.com”, you can simply use this staff email for the new staff profile.
- Please note that deactivating a staff profile does not automatically revoke their login. You must first revoke, then deactivate.
Key Information / Troubleshooting
- When you are invited to log in for the first time, note that the URL you are redirected to is https://identity.jobmanapp.com/. This is where a user logs into Jobman, after which they will be redirected to the main interface, jobmanapp.com, where their user will be connected to a staff profile inside the organisation they have been invited to join.
- When logging in for the first time, you will be prompted to enter an email address and password. Note: The email address you enter at this point will become your user email, so please check that it is the correct address, and is not currently connected to any existing staff profiles.
- You can check at any time what your user email is at https://identity.jobmanapp.com/account
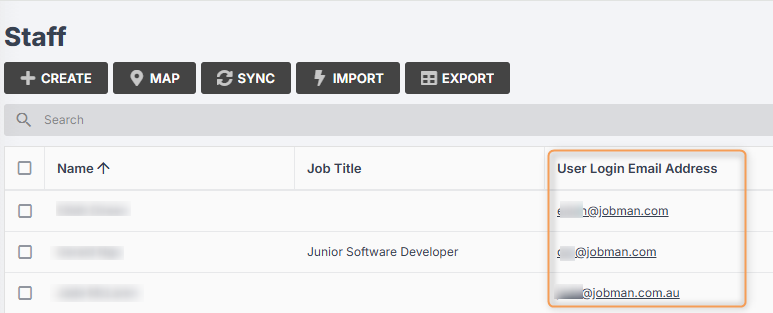
- Managers can check at any time which user emails are connected to which staff profiles by enabling the User Login Email Address column in the Staff tab:
- When accepting an invitation to log in, if you notice the email you have entered is incorrect (for example if your browser has auto-filled the field with another user’s login details), you can click Sign in with a different account:

- Once you have logged in, your user login and email will be attached to your staff profile until your login is revoked.
If a new user is having trouble logging in, here are some ways to try solving the problem:
- Look in Staff > Deactivated and enable the User Login Email Address column to see if there is a deactivated staff profile connected to the user who is experiencing difficulties. If you find one, revoke the login for that profile, then re-send the invitation to log in to the correct profile.
- Try revoking the user’s login, then re-sending the invitation to log in.
- Have the user go to identity.jobmanapp.com and Log out, then send them a new invitation to log in:

- If the user clicks on the invitation link and is not prompted to enter an email and password, they have not logged out properly.
Setting Up Two-Factor Authentication (Optional)
Two-factor authentication (2FA) is a specific type of multi-factor authentication that strengthens security by requiring two methods of identification (also referred to as authentication factors) to verify your identity.
If you would like to set up 2FA for your staff using Jobman, click here.