


Back to: Complete Jobman Set-Up Guide for Administrators
Use job settings to customise your Jobman software to suit your business.
We recommend that you complete your set-up in this order:
- Job Types
- Job Statuses
- Job Details
- Member Types.
Job Types
Differentiate between your various job types (for example: residential or commercial). These may be specific to your business, so you can define and allocate these as you wish. Job types are a filterable attribute, so you can search for all jobs of a specific type, or create a report for jobs of a specific type, etc.
Creating or Updating a Job Type
- Go to Settings > Jobs > Types and click Create.
- Name your job type.
- Click Create again.
You can click into an existing job type at any time to Update (rename) or Delete it.

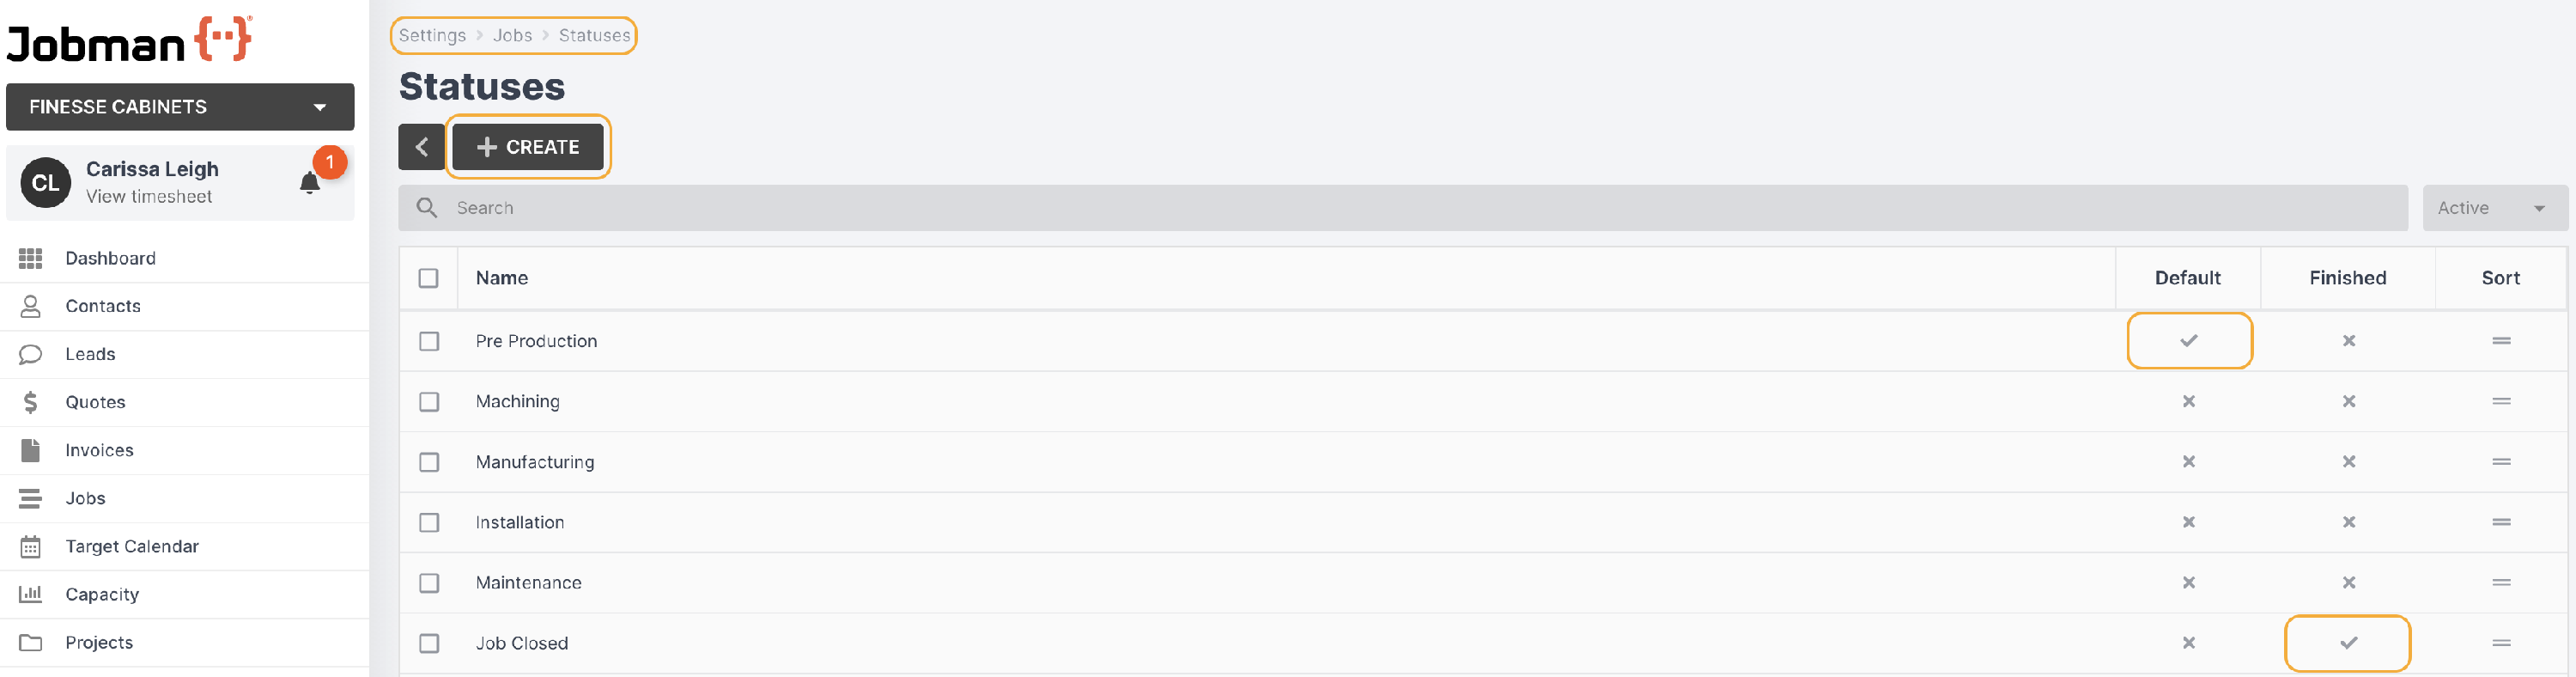
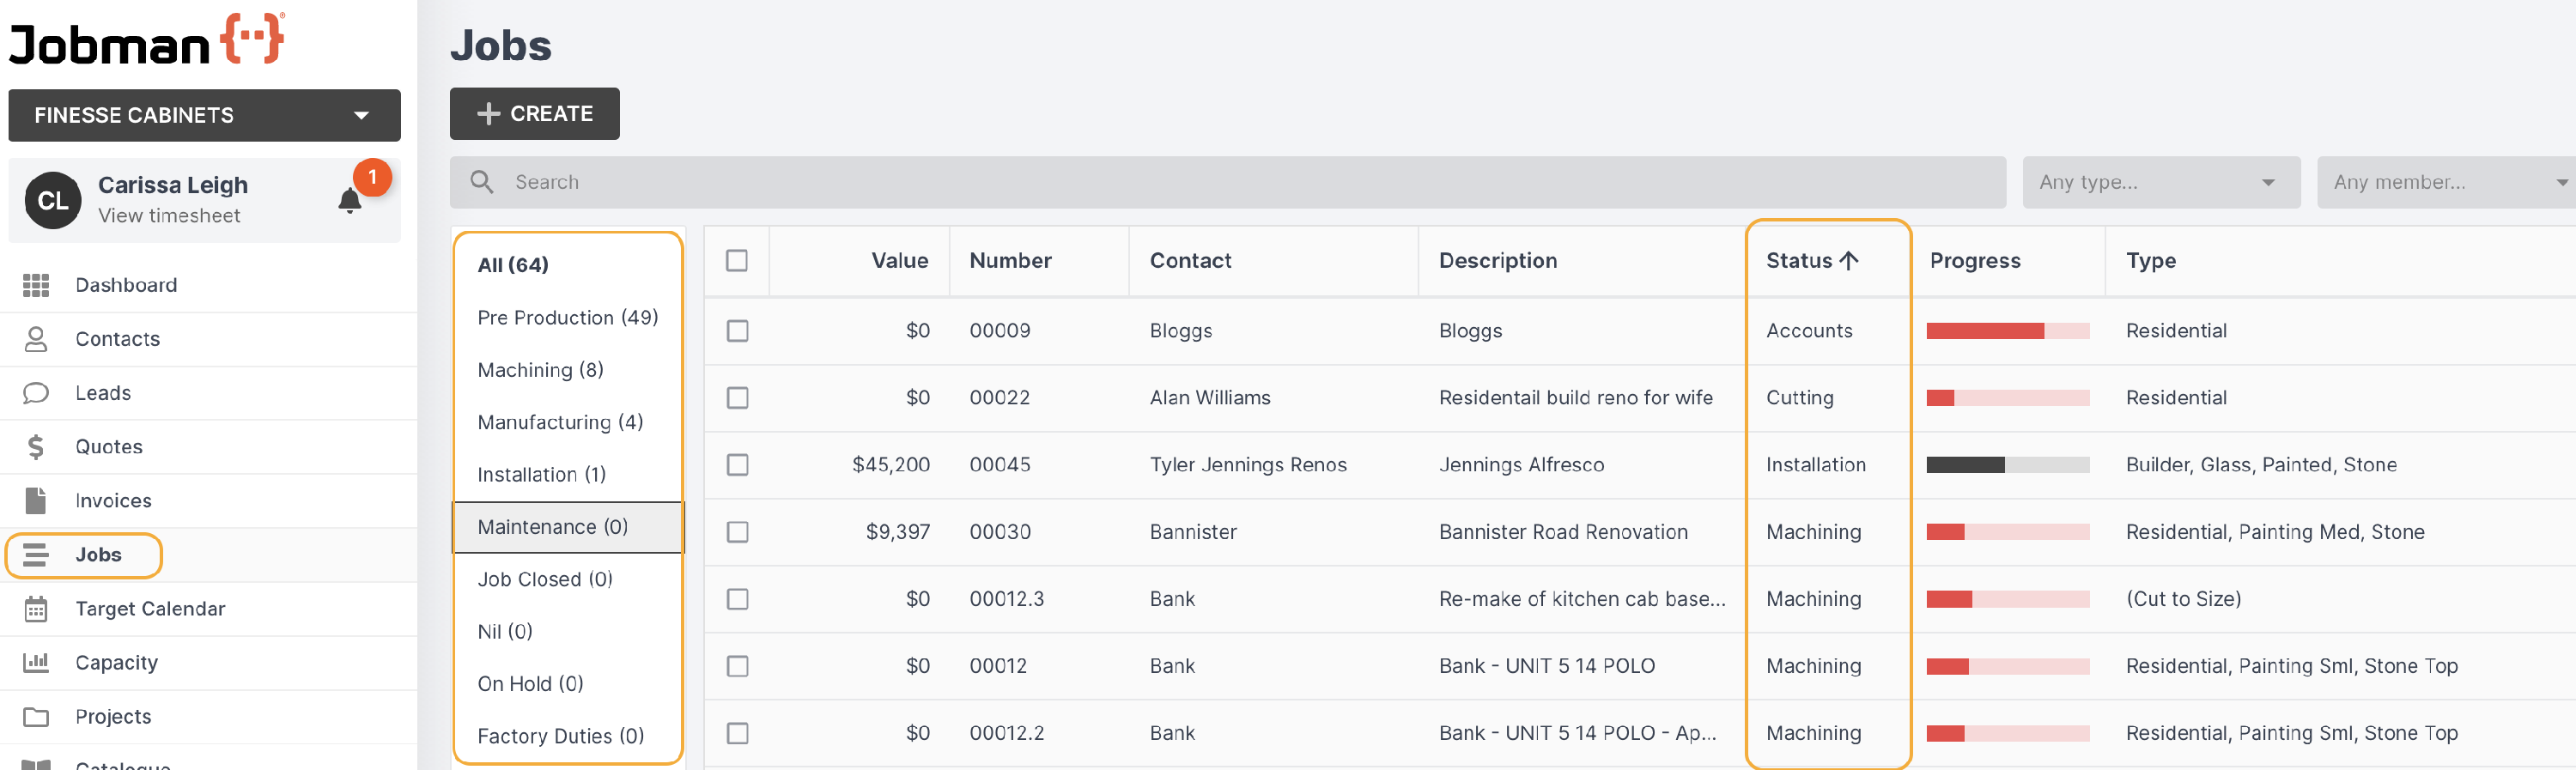
Job Statuses
You can use job statuses to define the current state of progress that a job has reached. As with types, job statuses are a filterable feature, so you can search for and report on jobs by status.
Automation: A job will automatically move to the next status once all tasks in a step of the workflow are completed.
Creating or Updating a Job Status
- Go to Settings > Jobs > Statuses and click Create.
- Name your job status.
- If this status marks the end of a job, select the checkbox for Jobs with this status are finished.
- Click Create again.
You can click into an existing job status at any time to Update (rename or select/deselect Finished), Delete, or Set as Default.
If you set a job status as default, any newly created jobs will automatically hold this status.
You can only have one default status.
You can have more than one finished status.
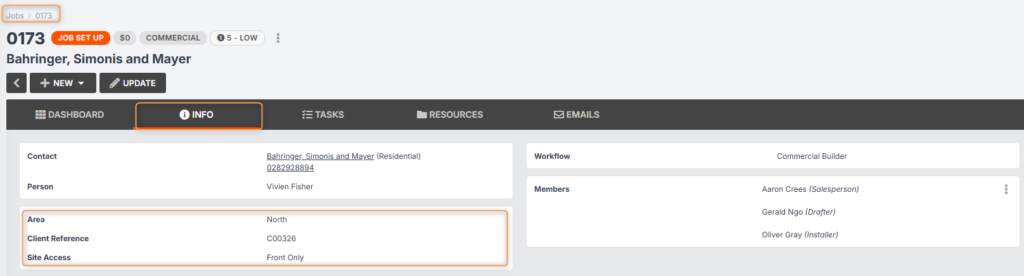
Job Details
Job details allow you to add and collect important information when creating or updating a job. Inside any existing job, the details can be viewed under the job info tab as shown below.
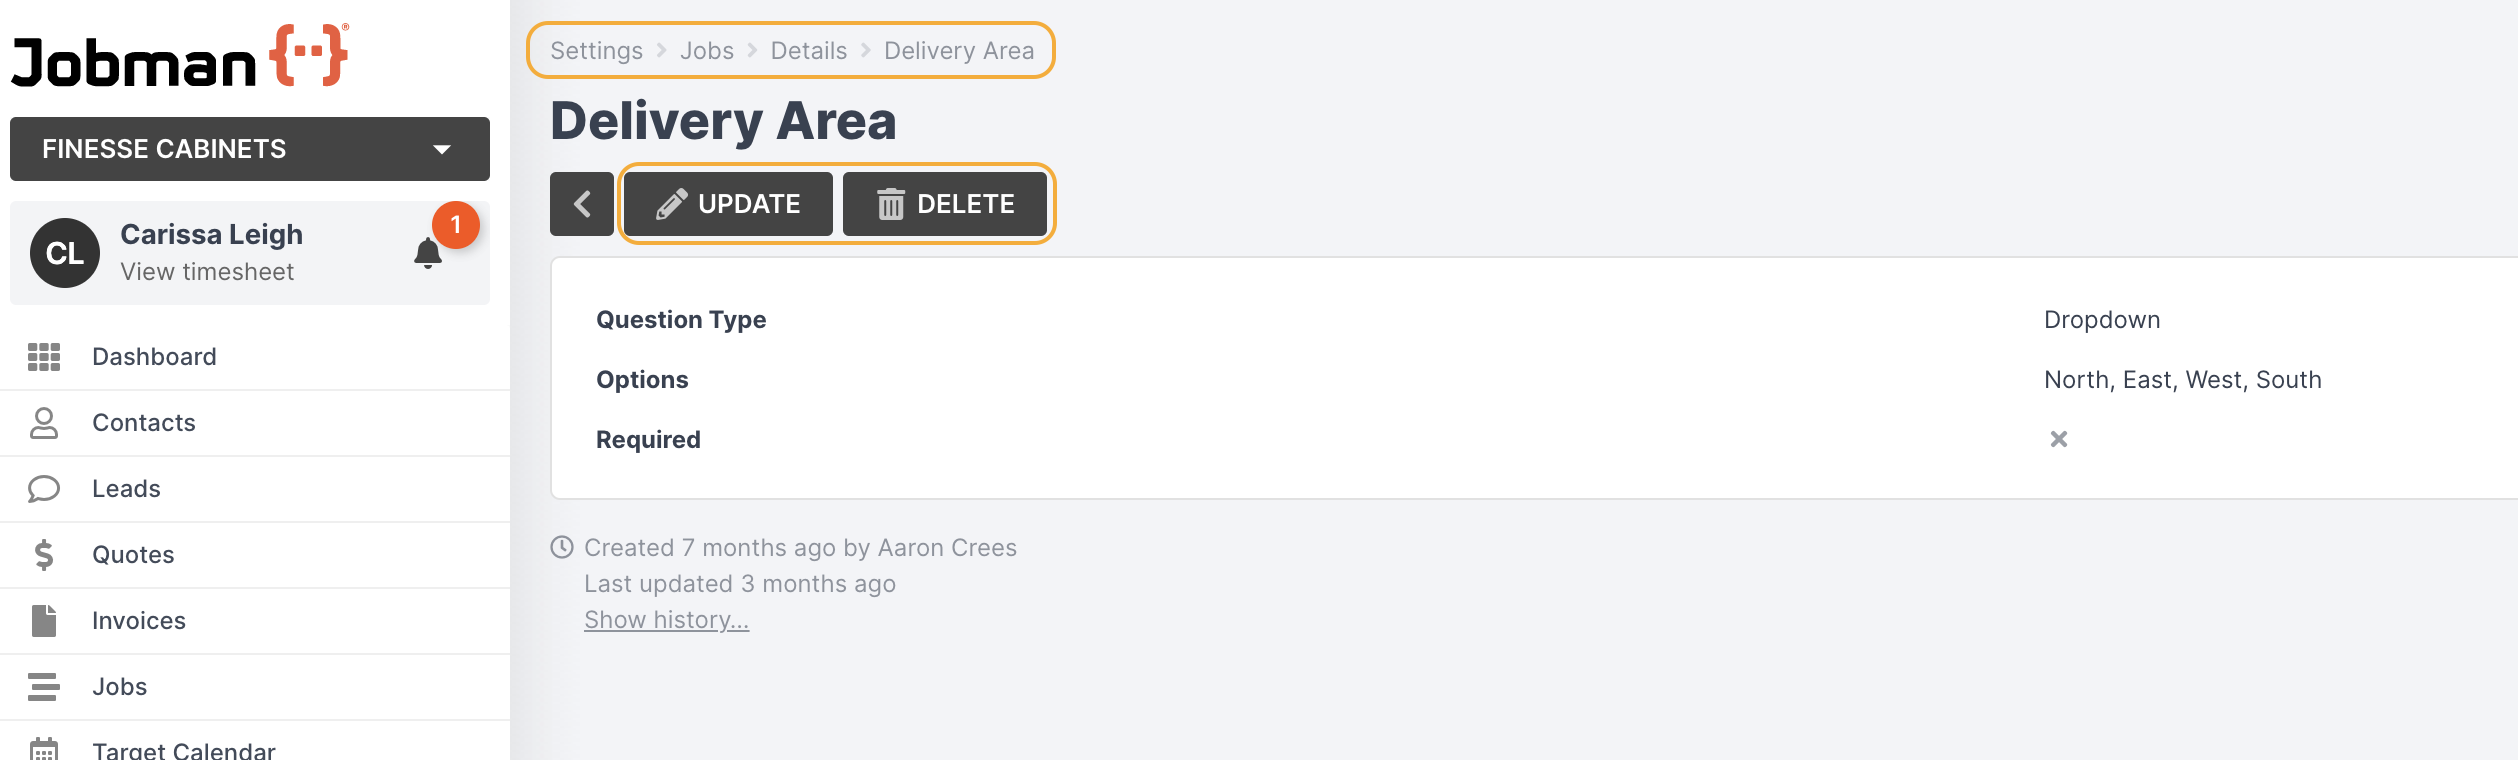
Creating or Updating a Job Detail
- Go to Settings > Jobs > Details and click Create.
- Name your job detail.
- Choose your question type from the drop-down.
What do each of the question types mean?
Text: Allows you to type in a few words or a short sentence.
Paragraph Text: Allows you to type several sentences of text.
Email Address: Enter an email address.
URL: Enter a web browser link, handy for a question regarding appliance types/models.
Number: Enter a numerical value.
Drop-down: Provide several options to select from, using a drop-down menu tab to display all options.
Checkbox: A filter/tick box.
Images: Upload images. Images must be JPEG or PNG files.
Files: Upload files. - If you select Drop-down, you will need to add some options. Type the option you would like to appear, add more by clicking Add another item.
- Tick the box for Required if you need this detail to be entered when a job is created. If you leave the box unticked, users will be able to create jobs without providing this detail.
You can click into an existing job detail at any time to Update or Delete it.
Job Members and Member Types
Members are added to a job to allocate certain staff to be responsible for that job and complete all the tasks in its workflow.
Members will receive notifications and correspondence related to the job, and can be automatically assigned to specific tasks in the workflow depending on their member type.
Member types are used to link individual staff to specific tasks, operations, notifications, etc.
For example, you might have a job member type called “Installer”, which is automatically assigned to the “Install” task.
Creating a New Member Type
To create a new member type, follow these steps:
- Go to Settings > Jobs > Member Types:

- Click Create, and you will be redirected to a new screen:

- Name your member type, e.g. “Check Measurer”.
- Choose whether this member type can be applied to All or Selected staff. If you choose Selected, a second drop-down will appear for you to choose one or more staff who can be given this member type.
- Under Assign to operations, choose All, Selected, or None. If you choose Selected, a second drop-down will appear for you to choose one or more operations to assign this member type to.
When you add one of your staff as this member type to a new job:
– If you chose all operations, your staff member will be automatically assigned to all tasks in the workflow for that job;
– If you chose selected operations, your staff member will be automatically assigned to the corresponding tasks in the workflow for that job;
– If you chose none, your staff member will not be automatically assigned to any tasks in the workflow for that job. - Tick the box for Assign to first member if you would like the first person added as a member to a job to be automatically given this member type. Leave the box unticked if you would rather assign a member type manually when first adding a member to a job.
- Tick the box for Required if you would like to prevent jobs from being created without assigning at least one member of this type.
- Click Create again.
Please Note: You cannot have more than one lead member type, job member type, and project member type with Assign to first member enabled.
Updating or Deleting a Member Type
When in Settings > Jobs > Member Types, you can:
- View the Staff column to see whether a member type can be allocated to all or selected staff.
- View the Assign to operations column to see which operations (if any) a member type has been assigned to.
- View the Assign to first member and Required columns to see if these options have been selected.
You can then click into any existing member type to view a summary of its settings.
- To edit the member type, click Update, enter any changes needed, then Save Changes.
- Click Delete to remove this member type from your settings.
Assigning Members to a Job
When creating a new job, if you have marked certain member types as Required, those member types will show up in the Create Job page:

Tips:
- You can assign more than one member type to the same person.
- You can also add multiple people with the same member type.
You can also add members to a lead, job, or project after you have created it, using these steps:
- Click into your job.
- Click the 3-dot menu at the top-left, then click Members:

A pop-up will appear listing any current members. You can click the 3-dot menu next to an existing member to Edit or Delete them.

- Click Add Member.
- A second pop-up will appear. Under Staff, either type a name or select from the drop-down:

- Use the Type drop-down to select one or more member types to assign to this staff person.
Note: You will only be able to select from member types that can be assigned to this staff person. - Click Add Member again.
Assigning Members to Tasks
Once you have added members to your job, if you go to the Tasks tab, your members will be assigned to specific tasks, provided you have linked your member types to all or selected operations.
You can also add members to a task manually, using these steps:
- Click on the task in the Tasks tab.
- Click Members:

- Start typing a name or use the drop-down to select a staff person:

Note: You cannot assign a member type when adding members this way.
The member for this task will also not appear in the Members list in the job.
The staff person will receive a notification that they have been added to a task, and their initials will appear on that task in the target calendar.
Filtering for Members and Member Types
- When in the Jobs tab, you can view columns for each member type, so you can see who is assigned as that member type:

- When filtering by members in the Jobs tabs, or in Reports, if you filter by member type first, the list of staff you can filter by will be limited to those assigned to that member type.