Skip to content
Jobman AcademyJobman Academy
  • Academy
  • My Account
Jobman AcademyJobman Academy
  • Academy
  • My Account

How to Create Agenda Screens for Your Jobs and Staff

Home » How to Create Agenda Screens for Your Jobs and Staff
Breadcrumb Abstract Shape

How to Create Agenda Screens for Your Jobs and Staff

  • February 21, 2025
  • Com 0

Back to: Complete Jobman Set-Up Guide for Administrators

0

As we did with leads, we will now create some agenda screens for your staff who will be working on your jobs.

An agenda screen is a to-do list for one or more staff in your organisation. Each agenda screen is typically created for a specific department, area, or team within the organisation, and contains a list of all job tasks needing to be completed by that team, in priority order.

Creating an Agenda Screen

To create an agenda screen for your staff, follow these steps:

  1. From the User Menu Panel, navigate to Settings > Agenda Screens.
  2. Click Create.
  3. Name your agenda screen.
  4. From the Item drop-down, select either Job, Lead, or Project.
  5. Click Create again.

You will be taken to a page for your new agenda screen, where you can customise further.

Customising an Agenda Screen

When you click into an agenda screen from the list under Settings > Agenda Screens, you will be shown some options at the top of the page:

  • Update: Change the name of the agenda screen.
  • Message: Type a message that will display on the agenda screen for staff to see.
  • Filters: Further define the parameters of your agenda screen:
  • Members: Assign or remove staff to view the agenda screen from their dashboard. You can also restrict staff to their own tasks, so they will not see tasks assigned to other members in that agenda screen.
  • Share: Generate a link to view your screen. See: Displaying an Agenda Screen.
  • Delete: A pop-up will ask you to confirm you want to delete the agenda screen. Deleted screens can be viewed using the Deleted filter at the top-right in Settings > Agenda Screens:

Understanding Your Agenda Screen

See the image below for an overview of what your agenda screen might look like.

  • Click into a job to update start/target dates.
  • Click into a job to change its priority level.
  • Upload any files or attachments.
  • Add notes to jobs.
  • View, assign or remove staff members from a task.
  • See the progress against jobs.

Creating a Priority Level

To create different priority levels for your tasks, follow these steps:

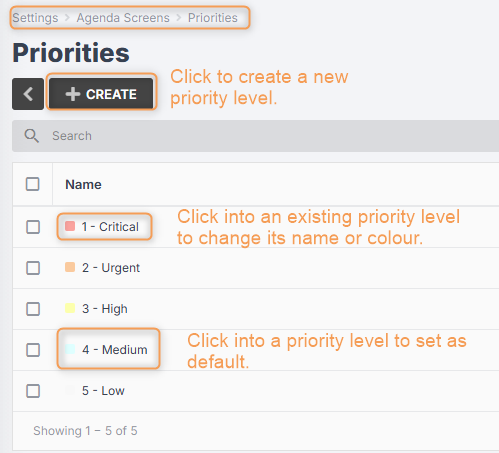
  1. Go to Settings > Agenda Screens and click Priorities:
  2. Click Create.
  3. Name your priority.
  4. Choose a colour that will designate your priority.
  5. Click Create again.

To update an existing priority, click into it and you can change the name or colour, or Set as Default.

You can set a priority level as the default, meaning it will automatically be assigned to all leads/jobs when they are created.

Assigning a Priority Level to a Job

You can assign or update a priority in a lead or job by following these steps:

  1. Click into the job.
  2. Click the three-dot menu next to the job number (see below).
  3. Click Priority.
  4. Choose a priority level from the drop-down (see below).
  5. Write a message (optional).
  6. Click Save Changes.

You can also click the current lead priority level to change it:


Previous Lesson
How to Create Labour Centres for Your Jobs
Lesson 4 within section Job Management.
Next Lesson
Understanding Your Capacity
Lesson 6 within section Job Management.

Course Syllabus

  • General Navigation and Usability
    • General Navigation
    • User Control and User Settings
    • User Licenses and Staff Types
    • Staff Roles and Permissions
  • Getting Started
    • Connect to Your Cloud File Storage
    • Connect to Your Accounting Software
    • Setting Up Your Staff
    • Setting Up and Managing Staff Login Details
  • CRM Management
    • How to Add Contacts
    • How to Manage Contacts
    • Contact Types, Roles, and Sources
    • Contact Emails and Resources
  • Lead Management
    • What is a Lead?
    • How to Create a Lead Workflow
    • How to Create a Sales Labour Centre
    • How to Create an Agenda Screen for Your Sales Team
    • Lead Settings: Types and Statuses
    • Lead Settings: Details
    • Lead Settings: Members and Member Types
    • Create Lead Item Types and Specifications
    • Automated Triggers in Lead Workflows
    • How to Create a Lead
    • How to Manage and Edit a Lead
  • Job Management
    • How to Create a Job Workflow
    • Automated Triggers in Job Workflows 
    • Job Settings: Types, Statuses, Details, and Members
    • How to Create Labour Centres for Your Jobs
    • How to Create Agenda Screens for Your Jobs and Staff
    • Understanding Your Capacity
    • How to Create a Job
    • How to Manage and Edit a Job
    • How to Create a Work Order from a Job
    • How to Use Your Target Calendar
  • Kiosk
    • How to Set Up Kiosk Staff Working Hours
    • Overview of Kiosk Mode Functions
    • How to Create Agenda Screens for Your Kiosk Staff
    • Staff Member Types and Automated Task Allocation
    • How to Create Activity Screens for Your Staff
  • Quoting
    • The Four Levels of a Jobman Quote
    • How to Build Products
    • How to Create Styles and Range Options
    • How to Build Quote Presets
    • Quote Templates
    • Quote Statuses
    • How to Create and Send a Quote
    • How to Refresh Quote Pricing
    • How to Copy and Revise Quotes
    • How to Create, Send, and Sync Invoices
  • Catalogue Management and Inventory
    • Catalogue Settings
    • Setting Prices and Measurements for Catalogue Materials
    • How to Create and Import Catalogue Materials
    • How to Create Catalogue Services
    • How to Add and Manage Inventory Items (Stock)
    • Price Matrices
  • Purchase Ordering and Inventory Picking
    • How to Create Purchase Order Statuses
    • Managing Job Resource Materials
    • How to Create and Send Purchase Orders
    • How to Manage, Edit, and Receive Purchase Orders
    • Picking List and Inventory
    • How to Set Up Minimum Stock Quantities for Purchase Ordering
    • Supplier Integration – Hafele
    • Supplier Integration – Wilson & Bradley
  • Reporting
    • Reports in Jobman
    • Quote Summary Report
  • Job Alerts and Forms
    • How to Create and Use Job Alerts
    • How to Create and Use Job Forms
  • Payroll Set-Up and Time & Attendance
    • How to Set Up Staff Pay Rates
    • How to Log Staff Time and Attendance
    • How to Log Staff Leave, Public Holidays, and Temporary Business Shutdowns
  • CAD/CAM Integration
    • How to Connect Your CAD/CAM Software
    • Cabinet Vision
    • Mozaik
    • Microvellum
    • Winner Flex
Copyright 2025 Jobman Pty Ltd. All rights reserved.
Jobman AcademyJobman Academy
Sign inSign up

Sign in

Don’t have an account? Sign up
Lost your password?

Sign up

Already have an account? Sign in