


Back to: Complete Jobman Set-Up Guide for Administrators
Jobman is a cloud-based software platform, meaning you can back up, view, and upload all of your important files & attach them to leads, jobs, and projects by connecting with your cloud file storage provider. Upload your documents using your software and allow all staff to see these.
Important: The purpose of the cloud file storage integration is to give Jobman somewhere to store and interact with the files that are directly related to your Jobman resources (i.e. contacts, jobs, leads, etc.)
The cloud file storage integration is not intended to give Jobman access to your entire cloud file storage system, and you cannot browse your entire cloud storage file system from within Jobman.
Additionally, there is no way in Jobman to browse the entire contents of your Jobman Files directory, but rather you can browse the files for a specific resource.
Please note: Some service providers do not handle the use of some specials characters (:, ‘, #, $, etc.) in their file names, and this may cause an error when trying to sync or update your data.
Cloud File Storage Connection Options:
- Dropbox, Microsoft OneDrive, Microsoft Sharepoint, Google Drive, Amazon S3 & FTP.
Setting Up Your Cloud File Storage
From the User Menu Panel, navigate to Settings > Cloud File Storage.
Before you proceed: make sure you have the correct level of access to the required cloud storage provider and folder you are wanting to link to.

- Check the current Driver. If this is correct, proceed to step 5.
- If you need to change the driver, click Update.
- Choose the appropriate driver and type in your Base Directory – i.e.: /Jobman Files.
- Click Save Changes.
- Click Connect to [Cloud File Storage Provider Name].
- You will be redirected to log in to your cloud file storage. Follow the prompts.
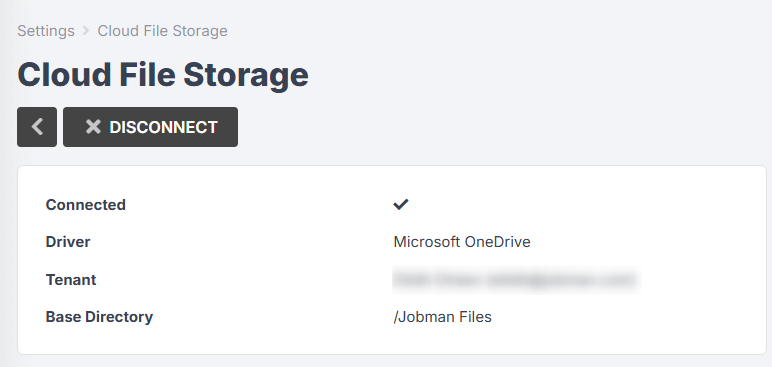
Once you have successfully connected, you will see a tick next to Connected, as well as the option to Disconnect above:
Tips: Connecting to Dropbox
In Dropbox, you can allow certain staff “view only” or “edit” permissions to your Jobman folders. To do this:
- Log in to Dropbox and locate your “Jobman Files” folder.
- Click the Share icon.
- Choose your permissions; i.e.: “can edit” or “can view”.
- Add the email addresses belonging to the staff who are to receive access.
- Click Share Folder.
Tips: Connecting to Sharepoint
When you connect to Sharepoint and login, you will not be redirected to Jobman, but to an external window where you will need to select the correct Sharepoint site. Almost all Sharepoint users will have multiple sites, so it is very important that you double-check which site you need to connect Jobman to.
Once you have selected the correct Sharepoint site, your Base Directory will be created in the “Documents” library within that Sharepoint site. Currently it is not possible for Jobman to interact with any other libraries in your Sharepoint site.
How to Structure Your Files and Folders
Once you have connected Jobman to your cloud file storage provider, you can create folders for your files, to save time searching through multiple documents within a folder. This can be actioned either from within Jobman or via your cloud file storage site.
Your cloud file storage will have a default Shared Documents folder, or equivalent.
Jobman cannot be set to access all files in your site’s Shared Documents, but it will use Shared Documents as a root folder within which to store Jobman files, starting with the base directory.
The base directory is the name of the folder (or the path to a folder) inside Shared Documents that Jobman will use (or create) to store relevant files, e.g. Organisation, Contacts, Leads, Jobs, etc.
For example, if you set the base directory to “/Jobman Files”, all of Jobman’s files will be accessible in your cloud file storage by going to Jobman > Shared Documents > Jobman Files.
If you set the base directory to “/Staff/Jobman Files”, the files would be accessible at Jobman > Shared Documents > Staff > Jobman Files.
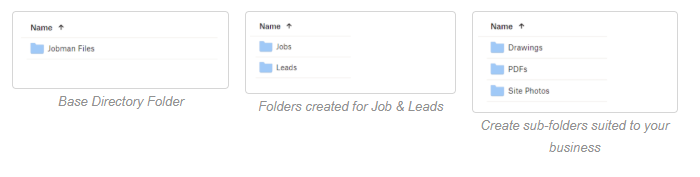
Whatever the base directory is set to, Jobman will create the following folders if they don’t already exist: Organisation, Contacts, Jobs, Leads, Projects, Alerts, Forms.
If you want these folders (Organisation, Contacts, etc.) to be created directly inside Shared Documents, you can set the base directory to “/”
We recommend however that you set the base directory to “/Jobman Files”.
Set Up File Directories In Jobman
You can create internal file folders straight from Jobman once you’ve connected your cloud file storage provider.
To do this, go to Files in the User Menu Panel.
To create a new heading file folder, click New Folder.
If you want to create a sub-folder, click into the heading folder first.

Template Folders
Template folders are automatically created in your Jobman software and cloud file storage when any new lead, job, or project is created.
In your cloud file storage you will see that the base directory name has been created, for example: Jobman Files.
- Inside this folder you will see your new folders. All of your data will upload here.
- You can also create sub-folders to better organise your files.
To set these up as standard folders for all jobs or leads, please create your required folders within the template folder, e.g. Jobman Files > Jobs > Template > Create Folder.
You can upload information for your jobs, leads, etc., to these folders, and then view them from inside Jobman.
Managing Your Folders
Once you’ve set up your folders, you can share, view details, rename or delete these by using the 3-dot menu next to the folder as shown below.

View Your Folders & Files
View, add or manage files in Jobman by clicking into the Resources tab in either your contact, lead, job or project.

Tips & Tricks
- For your existing files to be visible in Jobman, you need to move them to the relevant folder depending where you want to view them.
- If you are inside your cloud file storage and upload files to [base directory] > Organisation, you can browse and interact with these in Jobman by going to Files in the User Menu Panel.You can do this for “generic” files (i.e. not related to a specific job), where they can be viewed by any staff with the View files permission.

- Every time you create a contact, lead, job, project, job alert, or add a form to a job in Jobman, a folder will be created in the relevant directory in your cloud file storage to store the files for that resource.For example, you could see a folder in your cloud file storage in [base directory] > Jobs for “Job 00002”. Any files in here can be viewed in Jobman by navigating to Jobs > 00002 > Resources > Files:

- File permissions are scoped to each resource, so for example, you can have a staff member that can view lead files, but can’t view job files. You can also give permissions to upload files, update files, and delete files.
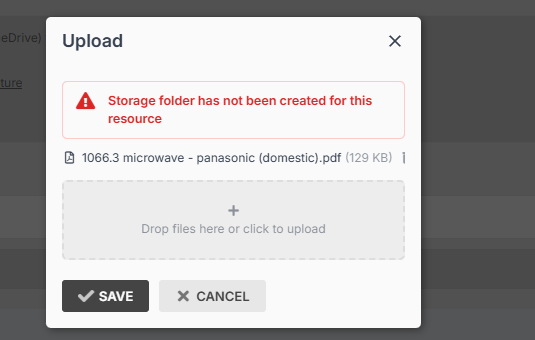
- Please note: for resources that were created before you connected to your cloud file storage, you just need to update the resource and make a small change (e.g. updating the description of a job). Otherwise you may receive this error message:
Switching to a Different Cloud File Storage Provider
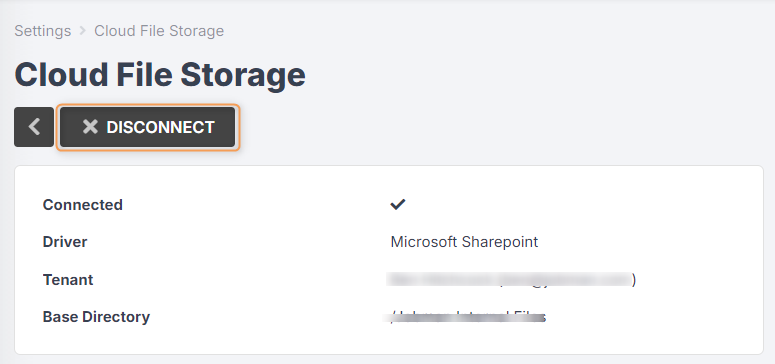
To change your cloud file storage provider, first to go Settings > Cloud File Storage and click Disconnect:
Then follow the steps outlined above to connect the new cloud file storage provider.
Important: Jobman doesn’t “sync” with cloud file storage, it simply uses the connected provider as a destination to look for and upload files to. When you disconnect from one provider and connect to another, Jobman will continue to look for the files in the previous destination (your old cloud file storage), but it has no way of “syncing” the files from your previous connection.
In order to see your old files in Jobman, you can manually download the contents of the Jobman Files folder from your original cloud file storage account, and upload them to your Jobman Files folder in your new cloud file storage account. Once you have done this, assuming none of the folders have been renamed, Jobman will be able to see those files again.