Skip to content
Jobman AcademyJobman Academy
  • Academy
  • My Account
Jobman AcademyJobman Academy
  • Academy
  • My Account

Contact Types, Roles, and Sources

Home » Contact Types, Roles, and Sources
Breadcrumb Abstract Shape

Contact Types, Roles, and Sources

  • February 20, 2025
  • Com 0

Back to: Complete Jobman Set-Up Guide for Administrators

0

Create and Update Contact Types

Use contact types to quickly and easily categorise your contacts for future reference. Set the parameters for contact types by adding payment terms and staff access levels.

Please note: To create a contact, you must allocate a contact type.

To create a new contact type, follow these steps:

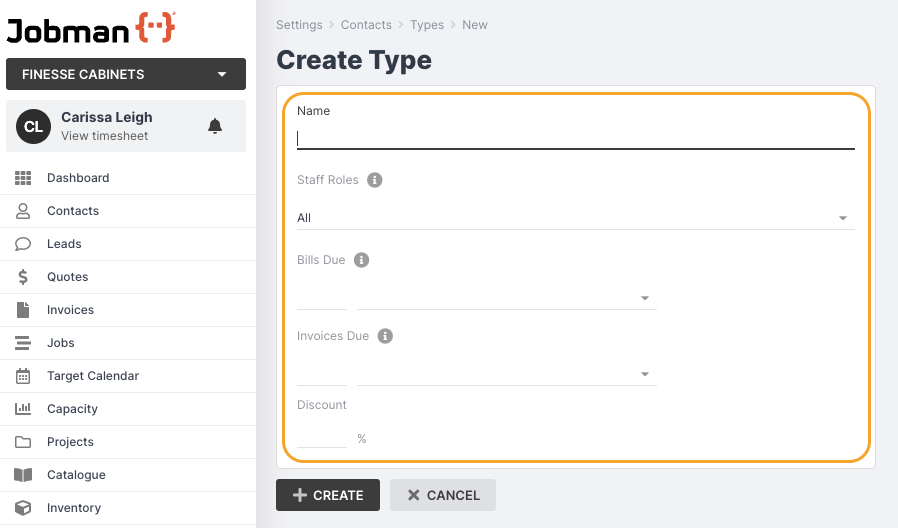
  1. From the User Menu Panel on the left, navigate to Settings > Contacts > Types.
  2. Click Create.
  3. Name your contact type.
  4. Choose whether all or selected staff members can access this contact.
  5. Set your payment terms for bills.
  6. Set your payment terms for invoices.
  7. Set a discount if applicable.
  8. If your contact type is a supplier, you must tick the box for Is supplier.
  9. Click Create.

You can edit your contact type at any time by clicking into it, then clicking Update, entering any changes, then clicking Save Changes.

Note: You can leave the payment terms blank if you want to use your default payment terms.

Tip: Set a new type for multiple contacts simultaneously by selecting the contacts you wish to update, clicking the With Selected drop-down, and clicking Change Type.

Create and Update Contact Roles

A contact might be an organisation that is a supplier, building company, etc.

You can then add individual people within this organisation to jobs and leads using assigned contact roles, e.g. “Project Manager” or “Installer”.

To create a contact role, follow these steps:

  1. From the User Menu Panel on the left, navigate to Settings > Contacts > Roles.
  2. Click Create.
  3. Name your contact role.
  4. Click Create.

You can rename your contact role at any time by clicking into it, then clicking Update, entering the new name, then clicking Save Changes.

Create and Track Contact Sources

Contact sources allow you to find out how your clients or customers have heard about your company.

To create a contact source, follow these steps:

  1. From the User Menu Panel, navigate to Settings > Contacts > Sources.
  2. Click Create.
  3. Name your source, e.g. Web Search.
  4. Click Create again.

Click into one of your contact sources at any time to Update (rename) or Delete it.

Please note: You cannot delete a source if it is currently allocated to one or more of your contacts.

When creating a new contact, you can select a contact source from the drop-down:

You can also click Add new source to create a new source and allocate to this contact on the fly.

To change the source for a contact, follow these steps:

  1. Go to Contacts and click into the contact you wish to update.
  2. Click Update.
  3. Choose a new source from the drop-down, or add a new one by clicking Add new source.
  4. Click Save Changes.

Tip: When browsing the Contacts tab, you can use the Source column to view and sort contacts by source.


Previous Lesson
How to Manage Contacts
Lesson 2 within section CRM Management.
Next Lesson
Contact Emails and Resources
Lesson 5 within section CRM Management.

Course Syllabus

  • General Navigation and Usability
    • General Navigation
    • User Control and User Settings
    • User Licenses and Staff Types
    • Staff Roles and Permissions
  • Getting Started
    • Connect to Your Cloud File Storage
    • Connect to Your Accounting Software
    • Setting Up Your Staff
    • Setting Up and Managing Staff Login Details
  • CRM Management
    • How to Add Contacts
    • How to Manage Contacts
    • Contact Types, Roles, and Sources
    • Contact Emails and Resources
  • Lead Management
    • What is a Lead?
    • How to Create a Lead Workflow
    • How to Create a Sales Labour Centre
    • How to Create an Agenda Screen for Your Sales Team
    • Lead Settings: Types and Statuses
    • Lead Settings: Details
    • Lead Settings: Members and Member Types
    • Create Lead Item Types and Specifications
    • Automated Triggers in Lead Workflows
    • How to Create a Lead
    • How to Manage and Edit a Lead
  • Job Management
    • How to Create a Job Workflow
    • Automated Triggers in Job Workflows 
    • Job Settings: Types, Statuses, Details, and Members
    • How to Create Labour Centres for Your Jobs
    • How to Create Agenda Screens for Your Jobs and Staff
    • Understanding Your Capacity
    • How to Create a Job
    • How to Manage and Edit a Job
    • How to Create a Work Order from a Job
    • How to Use Your Target Calendar
  • Kiosk
    • How to Set Up Kiosk Staff Working Hours
    • Overview of Kiosk Mode Functions
    • How to Create Agenda Screens for Your Kiosk Staff
    • Staff Member Types and Automated Task Allocation
    • How to Create Activity Screens for Your Staff
  • Quoting
    • The Four Levels of a Jobman Quote
    • How to Build Products
    • How to Create Styles and Range Options
    • How to Build Quote Presets
    • Quote Templates
    • Quote Statuses
    • How to Create and Send a Quote
    • How to Refresh Quote Pricing
    • How to Copy and Revise Quotes
    • How to Create, Send, and Sync Invoices
  • Catalogue Management and Inventory
    • Catalogue Settings
    • Setting Prices and Measurements for Catalogue Materials
    • How to Create and Import Catalogue Materials
    • How to Create Catalogue Services
    • How to Add and Manage Inventory Items (Stock)
    • Price Matrices
  • Purchase Ordering and Inventory Picking
    • How to Create Purchase Order Statuses
    • Managing Job Resource Materials
    • How to Create and Send Purchase Orders
    • How to Manage, Edit, and Receive Purchase Orders
    • Picking List and Inventory
    • How to Set Up Minimum Stock Quantities for Purchase Ordering
    • Supplier Integration – Hafele
    • Supplier Integration – Wilson & Bradley
  • Reporting
    • Reports in Jobman
    • Quote Summary Report
  • Job Alerts and Forms
    • How to Create and Use Job Alerts
    • How to Create and Use Job Forms
  • Payroll Set-Up and Time & Attendance
    • How to Set Up Staff Pay Rates
    • How to Log Staff Time and Attendance
    • How to Log Staff Leave, Public Holidays, and Temporary Business Shutdowns
  • CAD/CAM Integration
    • How to Connect Your CAD/CAM Software
    • Cabinet Vision
    • Mozaik
    • Microvellum
    • Winner Flex
Copyright 2025 Jobman Pty Ltd. All rights reserved.
Jobman AcademyJobman Academy
Sign inSign up

Sign in

Don’t have an account? Sign up
Lost your password?

Sign up

Already have an account? Sign in