Skip to content
Jobman AcademyJobman Academy
  • Academy
  • My Account
Jobman AcademyJobman Academy
  • Academy
  • My Account

How to Copy and Revise Quotes

Home » How to Copy and Revise Quotes
Breadcrumb Abstract Shape

How to Copy and Revise Quotes

  • February 21, 2025
  • Com 0

Back to: Complete Jobman Set-Up Guide for Administrators

0

Once you’ve created and sent a quote, you may wish to copy it (if you need to create a similar quote quickly) or revise it.
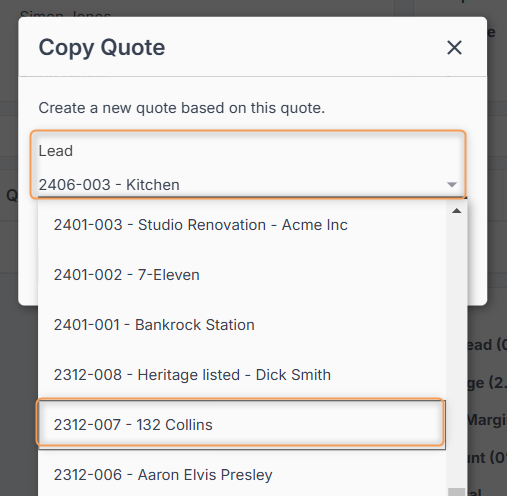
How to Copy a Quote

You can make a copy of a created quote and send to either the same lead or a different lead. This is useful when you have a standard product that you quote for consistently, or when you want to re-send a quote but with minor adjustments.

To copy a quote, use the 3-dot menu dropdown as shown below:

You can then use the Lead drop-down to select either the original lead or a new one:

Creating a Variation

Variations allow for you to make additional quotes once a job has been started and link these quotes to the job to update job values, operational times, material handling and visibility.

Important: You can only create variations for jobs that have been generated from a lead. Jobs that have been created from the Jobs tab will not allow creation of variations.

To create a variation, follow these steps:

  1. Click into your job, and navigate to the Info tab.
  2. At the top of tab, you will see the Lead info:
  3. Click on the lead number. This will redirect you to the lead.
  4. Click New > Quote:
  1. Complete your normal quoting process, and set the quote status to Accepted.
  2. Click into your job again, and navigate to Resources > Quotes.
  3. Click Add, and select the quote you just created:
  1. Job values and operation times/materials will automatically update to reflect the additional quote.

Important: Simply revising or refreshing a quote that is attached to a job WILL NOT create a variation or amend values. This ensures complete transparency regarding any changes made during the life cycle of the job.

Tip: You can create a variation just for a work order. Follow the above process but choose Add > Quote inside the work order rather than the parent job.

How to Revise a Quote

When a quote has been accepted, but you or the client wants to make revisions, you can do so by following these steps:

  1. Click into the quote you want to revise. Note: The quote status must either be superseded or accepted.
  2. Click New Revision, then Create.
  3. You will be taken to a new page to revise your quote.

In the example below, you will see that the quote number has changed to 2311-001/02. The number at the end will continue increasing with each revision.

Open the quote, ensure the quote status is either ‘Accepted’ or ‘Superseded’, and click ‘New Revision’.
Once you create your revision, you will be taken straight to the new quote!

Note: You can see all the different versions of a quote in Leads > [Lead #] > Dashboard or Leads > [Lead #] > Resources > Quotes.

Please Note: If you create a revision after a job has already been generated, this will NOT update your job values. We do not recommend adding a revised quote to a created job, as this will add together the total values of all quote versions, resulting in inflated job values.


Previous Lesson
How to Refresh Quote Pricing
Lesson 8 within section Quoting.
Next Lesson
How to Create, Send, and Sync Invoices
Lesson 10 within section Quoting.

Course Syllabus

  • General Navigation and Usability
    • General Navigation
    • User Control and User Settings
    • User Licenses and Staff Types
    • Staff Roles and Permissions
  • Getting Started
    • Connect to Your Cloud File Storage
    • Connect to Your Accounting Software
    • Setting Up Your Staff
    • Setting Up and Managing Staff Login Details
  • CRM Management
    • How to Add Contacts
    • How to Manage Contacts
    • Contact Types, Roles, and Sources
    • Contact Emails and Resources
  • Lead Management
    • What is a Lead?
    • How to Create a Lead Workflow
    • How to Create a Sales Labour Centre
    • How to Create an Agenda Screen for Your Sales Team
    • Lead Settings: Types and Statuses
    • Lead Settings: Details
    • Lead Settings: Members and Member Types
    • Create Lead Item Types and Specifications
    • Automated Triggers in Lead Workflows
    • How to Create a Lead
    • How to Manage and Edit a Lead
  • Job Management
    • How to Create a Job Workflow
    • Automated Triggers in Job Workflows 
    • Job Settings: Types, Statuses, Details, and Members
    • How to Create Labour Centres for Your Jobs
    • How to Create Agenda Screens for Your Jobs and Staff
    • Understanding Your Capacity
    • How to Create a Job
    • How to Manage and Edit a Job
    • How to Create a Work Order from a Job
    • How to Use Your Target Calendar
  • Kiosk
    • How to Set Up Kiosk Staff Working Hours
    • Overview of Kiosk Mode Functions
    • How to Create Agenda Screens for Your Kiosk Staff
    • Staff Member Types and Automated Task Allocation
    • How to Create Activity Screens for Your Staff
  • Quoting
    • The Four Levels of a Jobman Quote
    • How to Build Products
    • How to Create Styles and Range Options
    • How to Build Quote Presets
    • Quote Templates
    • Quote Statuses
    • How to Create and Send a Quote
    • How to Refresh Quote Pricing
    • How to Copy and Revise Quotes
    • How to Create, Send, and Sync Invoices
  • Catalogue Management and Inventory
    • Catalogue Settings
    • Setting Prices and Measurements for Catalogue Materials
    • How to Create and Import Catalogue Materials
    • How to Create Catalogue Services
    • How to Add and Manage Inventory Items (Stock)
    • Price Matrices
  • Purchase Ordering and Inventory Picking
    • How to Create Purchase Order Statuses
    • Managing Job Resource Materials
    • How to Create and Send Purchase Orders
    • How to Manage, Edit, and Receive Purchase Orders
    • Picking List and Inventory
    • How to Set Up Minimum Stock Quantities for Purchase Ordering
    • Supplier Integration – Hafele
    • Supplier Integration – Wilson & Bradley
  • Reporting
    • Reports in Jobman
    • Quote Summary Report
  • Job Alerts and Forms
    • How to Create and Use Job Alerts
    • How to Create and Use Job Forms
  • Payroll Set-Up and Time & Attendance
    • How to Set Up Staff Pay Rates
    • How to Log Staff Time and Attendance
    • How to Log Staff Leave, Public Holidays, and Temporary Business Shutdowns
  • CAD/CAM Integration
    • How to Connect Your CAD/CAM Software
    • Cabinet Vision
    • Mozaik
    • Microvellum
    • Winner Flex
Copyright 2025 Jobman Pty Ltd. All rights reserved.
Jobman AcademyJobman Academy
Sign inSign up

Sign in

Don’t have an account? Sign up
Lost your password?

Sign up

Already have an account? Sign in