Catalogue materials are items which you buy from your suppliers, and are used to manufacture your products.
You can add materials to your catalogue by importing from a spreadsheet, or by creating them manually one at a time.
How to Import Catalogue Materials
Step 1: Prepare your Data
If you don’t already have a list of your current products, we recommend contacting your accounts manager or sales representative to obtain an excel spreadsheet of your purchases and the product information, to easily complete your data import.
You can also find ready-to-import supplier catalogues at Jobman’s download centre.
Step 2: Create an Import
From the User Menu Panel on the left, navigate to Catalogue and click Import.
Click Create, then Download Sample CSV.
Once your CSV file has downloaded, fill it in with your catalogue data. Pro Tips for your CSV Data Follow these guidelines to reduce the chance of errors when uploading. Supplier Names: Supplier names must: 1. Already exist in your contacts list, and 2. Match exactly. Example: If your contact is “Laminex PTY”, you cannot enter “Laminex” – it must be “Laminex PTY”. Pricing Fields: Must only contain numbers and decimal points. No currency symbols, and no more than 2 decimal places. Sell Price Strategy or Fixed Price: If you set the Sell Price Strategy column to Variable to utilise Jobman’s automation, make sure there is no data in the Fixed Price column. You cannot have both fields filled out. Unit ID Columns: Any column that has Unit ID in the title is case sensitive and can only use the following variables: Length – kilometer, mile. Volume – litre. Mass – kilogram. Quantity – each, sheet, roll, piece, square_metre, lineal_metre, pack, pair, minute, hour, day, week.
IMPORTANT:
Delete entries not in this file – If you are exporting and reimporting your CSV file, you can click this checkbox, and upon re-import, the materials NOT listed in your CSV will be deleted from your catalogue.
Please Note: The following columns must be populated for import:
Supplier (must be a contact prior to import)
Price
Units per price
Unit price
Selling price strategy (Variable or Fixed) – Variable is recommended
Name
SKU (not required but recommended)
Category
What is Profit Percentage?
The Profit Percentage column refers to Profit Margin, not Profit Mark-up.
The difference is that a mark up percentage is proportionate to the cost, whereas the margin percentage is proportionate to your revenue.
For example, if you buy a product for $10 and sell it for $12, that $2 difference gives you a 20% mark-up (2 out of 10), but only a 16.66% profit margin (2 out of 12).
Jobman is set up to use margin percentage, not mark up percentage. You can use an online margin calculator to help you work out your margin percentage based on cost and revenue amounts.
Once you’ve completed your CSV file, you can now upload it to import your items. Drag-and-drop or click to upload your file.
Select any applicable checkboxes under Advanced.
Click Create.
You will be taken to a summary page to confirm the details.
Once you’re ready to import, click Start.
Once complete, you will see an Import Successful notification with a summary of the import and any actions that were taken.
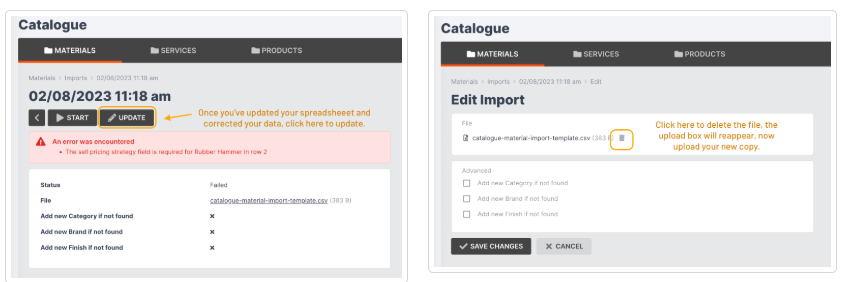
Managing Import Errors
If you receive any error messages when attempting an import, please amend your spreadsheet and try again.
Open your CSV file.
Amend the errors listed from your import summary.
Save your document.
Click Update.
Click the trash icon next to the previously uploaded file.
Upload your new file.
Click Save Changes.
Click Start.
How to Manually Add Catalogue Materials
To add materials manually, follow the steps below:
From the User Menu Panel, navigate to Catalogue > Materials.
Click Create.
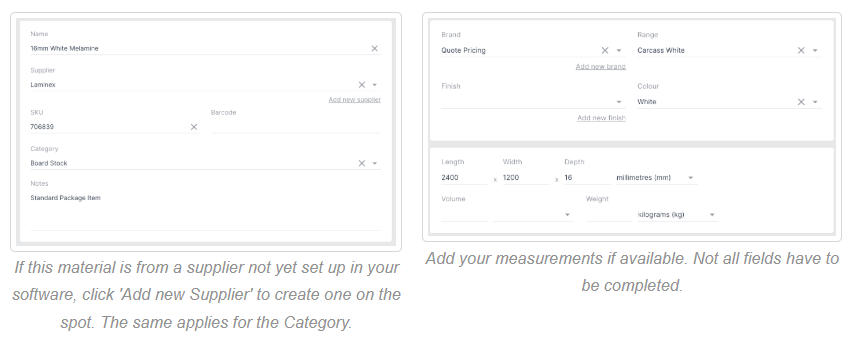
Enter the material name and choose a supplier from the drop-down.
Enter the SKU and barcode, if applicable.
Select a category.
Add notes, if applicable.
Enter the brand, range, finish, and colour. (Note: You may want to set the brand as Quote Pricing.)
Enter the material measurements.
Set your pricing (examples below) and pricing strategy, overhead, wastage and profit margin.
Select the optimisation if required.
Set the status for the material (available or not available to order).
Click Create.
How to Add Catalogue Images and URLs
Add images and URLs to your catalogue materials to easily differentiate between materials and redirect to supplier websites for more information.
Once you have added images to your catalogue, they will also be visible in your inventory, in material browsing for quotes and purchase orders, and in the Kiosk when receiving purchase orders.
Adding Images and Thumbnails
Important: You will need to add image URLs, not the actual images themselves. This gives you the flexibility to link to images from anywhere on the internet without having to download them or take up space in your cloud file storage.
Thumbnail Images versus Featured Images:
Thumbnails are smaller, compressed images, whereas Featured Images are larger and have higher resolution.
You can choose to add either a Thumbnail Image, a Featured Image, or both. Thumbnails will load more quickly, so we recommend adding them to improve your experience when browsing the catalogue. If you do choose to add Featured Images to your catalogue, you can hover over an image anywhere in your software and a larger version of the image will appear:
To manually add images to your catalogue, follow these steps:
Navigate to your supplier website and search for the material you want.
Right-click the Thumbnail/Feature Image.
Click Copy Image Address (not Copy Image).Note: some browsers may say Copy Image Link or Copy Image URL, etc.
In Jobman, navigate to Catalogue > Materials and either click into the material you want, or create a new one.
Paste the copied image URL into the Thumbnail URL or Featured Image URL fields as shown below, and the image will automatically appear in your software.
Click Save Changes.
You will now be able to see images for this item in your catalogue, inventory, material browsing for quotes and purchase orders, and in the Kiosk when receiving purchase orders.
Important: To see the images in various parts of your software, make sure the Images column is enabled:
How to Add Catalogue Supplier External URLs
Add External URLs to your catalogue to easily redirect to your supplier website.
To manually add External URLs to your catalogue, follow these steps:
Navigate to your supplier website and search for the material you want.
Copy the URL from the address bar up the top:
In Jobman, navigate to Catalogue > Materials and either click into the material you want, or create a new one.
Paste the copied URL into the External URL box as shown below:
Click Save Changes.
You will now be able to click this link in your catalogue and be redirected to the supplier webpage for this material. Make sure the External URL column is enabled!
You can also click into the material itself and click Visit URL to be redirected to the supplier webpage for this material.
How to Add Catalogue Item Descriptions
Add material descriptions to provide extra information about a material and keep your naming conventions brief.
We recommend using the Description field for external information relevant to a catalogue material, as opposed to the Notes field which is meant for internal communication.
When using the Supplier Integration API connection, the description field will automatically fill out with extra information provided by the supplier, such as installation notes.
To manually add descriptions to your catalogue, follow these steps:
Navigate to Catalogue > Materials and either click into the material you want, or create a new one.
Enter a description in the Description field:
Click Save Changes.
You will now be able to see the material description in your catalogue. Make sure the Description column is enabled!
Catalogue Item Statuses and Substitutes
Use catalogue item statuses to define whether your catalogue materials/services are available or not available to order.
Use catalogue item substitutes to assist your staff in choosing an appropriate alternative when a material/service is unavailable to order.
Setting or Updating a Catalogue Item Status
The item statuses you can choose from are:
available – Available to order
not_available – Not available to order
You can set an item status when you create or import catalogue items.
If you need to update an existing catalogue item status, follow these steps.
From the User Menu Panel, navigate to Catalogue.
Click into the material or service you want to update.
Click Update.
Choose a new status from the Status drop-down.
Click Save Changes.
Adding a Catalogue Item Substitute
Set up item substitutes to create alternative options for when a material or service is not available to order. You may also have the same item from different suppliers at different prices. Setting up item substitutes will allow you to quote accurately based on which item you need to purchase.
To set up an item substitute, follow these steps:
From the User Menu Panel, navigate to Catalogue.
Click into the material or service you want to update.
Click Add substitute (shown below).
Choose a substitute from the drop-down, or type to search.
Click Add Substitute.
Do you order the same material from multiple suppliers?
Set up the material in your catalogue and add all the substitutes from different suppliers to that one material. When you order the from any of your suppliers, it will come into your inventory under the SKU code that you have set the material up with.
Not Available to Order – Examples
Some cases where you might set an item to Not Available include:
If you have an item set up with the Quote Pricing brand, you must set its status to Not Available, because Quote Pricing items are generic range options used for quoting purposes only.
You have been notified by your supplier that a product is unavailable for a certain amount of time.
The product has been discontinued by the supplier.
The below notification will show inside products that have been set to Not Available to Order: