Skip to content
Jobman AcademyJobman Academy
  • Academy
  • My Account
Jobman AcademyJobman Academy
  • Academy
  • My Account

How to Create Labour Centres for Your Jobs

Home » How to Create Labour Centres for Your Jobs
Breadcrumb Abstract Shape

How to Create Labour Centres for Your Jobs

  • February 21, 2025
  • Com 0

Back to: Complete Jobman Set-Up Guide for Administrators

0

Just like you did for your sales team, you will now need to create some labour centres for your jobs.

What are Labour Centres?

Labour centres are a measure of your operational capacity, broken into segments. Each labour centre is linked to one or more operations, (such as “Cutting”, “Assembling”, “Install”), and consists of the number of staff available for that operation, multiplied by the number of available hours each day.

What are Operations?

Operations serve as the connection between labour centres and tasks, designed for reporting and capacity planning. Customise operations to fit your organisation’s needs.

Each operation will be assigned to one or more tasks, which are in turn organised into workflows. When your staff track time against their tasks, the corresponding operation will be shown in your job cost report, which will display estimated versus actual time spent on each operation.

How to Create Job Operations

From the User Menu Panel on the left, click Settings > Operations > Jobs > Create.

  1. Name your operation.
  2. Choose a colour (optional – see next section).
  3. Assign your operation to a labour centre (you can do this later if you haven’t created any labour centres).
  4. Set your operation costs, overheads, wastage and profit margins if required.
  5. Click Create.

Tip: Update an operation at any time by clicking into the operation and selecting either Update or Delete.

Please Note: You cannot have two operations with the same name.

Marking Operations as “Critical”

You can mark operations as “critical”, allowing your staff members to see relevant task dates on jobs/leads/projects screens, progress charts and agenda screens.

You can mark operations as critical in Settings > Operations > {Operation} > Update.

Simply tick the checkbox for Critical, then Save Changes:

Once an operation is marked as critical, you’ll have the ability to enable that column in the relevant screen, such as the progress chart, target calendar, agenda screens, etc.

Creating a Labour Centre

To create a new labour centre, follow these steps:

  1. From the User Menu Panel, navigate to Settings > Labour Centres.
  2. Click Create.
  3. Name your labour centre, e.g. “Assembly”, or “Cutting”.
  4. Using the Operations drop-down, select all applicable operations for this labour centre.
  5. Enter the number of hours available for each day. (You may have different hours available on different days.)
  6. Click Create again.

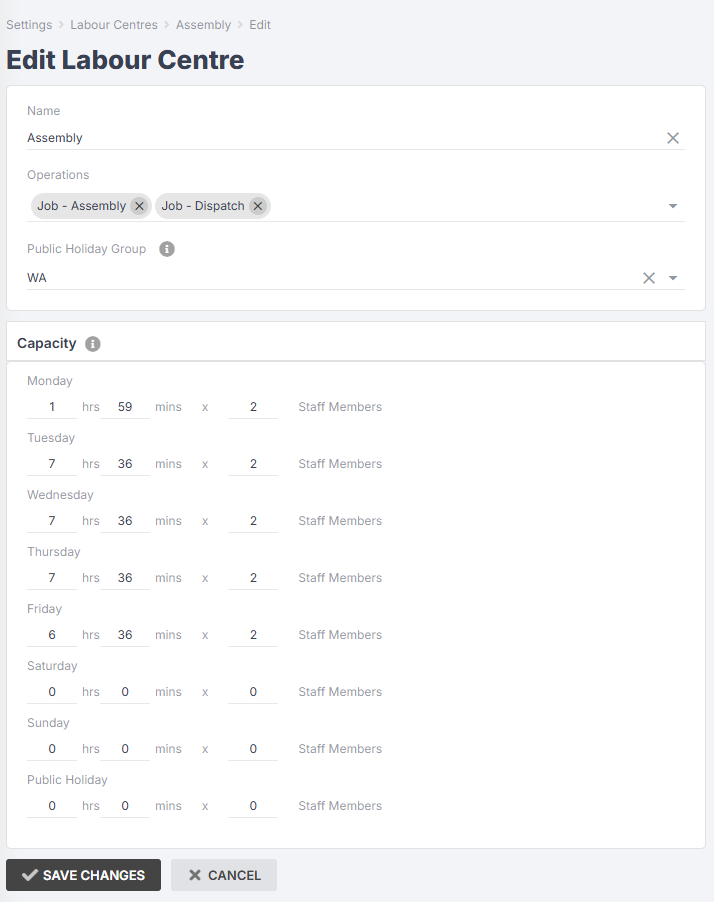
Example: Labour Centre set-up

Important: If you do not have any available hours on weekends or public holidays, make sure to enter a zero (0) in these fields, otherwise you will be set to infinite availability by default.

Tip: When you create a labour centre and link it to one or more operations, your changes will automatically be reflected in Settings > Operations:

Editing or Deleting a Labour Centre

To make edits to a labour centre, follow these steps:

  1. From the User Menu Panel, navigate to Settings > Labour Centres.
  2. Click into the labour centre you want to edit.
  3. Click Update.
  4. From here you can change the name, add/remove operations, or update the available hours if required.
  5. Click Save Changes.

If you need to delete a labour centre, either click into the one you want to delete and hit the delete button, or delete multiple by clicking the checkboxes from the Labour Centre screen and using the ‘With Selected’ drop-down to delete.


Previous Lesson
Job Settings: Types, Statuses, Details, and Members
Lesson 3 within section Job Management.
Next Lesson
How to Create Agenda Screens for Your Jobs and Staff
Lesson 5 within section Job Management.

Course Syllabus

  • General Navigation and Usability
    • General Navigation
    • User Control and User Settings
    • User Licenses and Staff Types
    • Staff Roles and Permissions
  • Getting Started
    • Connect to Your Cloud File Storage
    • Connect to Your Accounting Software
    • Setting Up Your Staff
    • Setting Up and Managing Staff Login Details
  • CRM Management
    • How to Add Contacts
    • How to Manage Contacts
    • Contact Types, Roles, and Sources
    • Contact Emails and Resources
  • Lead Management
    • What is a Lead?
    • How to Create a Lead Workflow
    • How to Create a Sales Labour Centre
    • How to Create an Agenda Screen for Your Sales Team
    • Lead Settings: Types and Statuses
    • Lead Settings: Details
    • Lead Settings: Members and Member Types
    • Create Lead Item Types and Specifications
    • Automated Triggers in Lead Workflows
    • How to Create a Lead
    • How to Manage and Edit a Lead
  • Job Management
    • How to Create a Job Workflow
    • Automated Triggers in Job Workflows 
    • Job Settings: Types, Statuses, Details, and Members
    • How to Create Labour Centres for Your Jobs
    • How to Create Agenda Screens for Your Jobs and Staff
    • Understanding Your Capacity
    • How to Create a Job
    • How to Manage and Edit a Job
    • How to Create a Work Order from a Job
    • How to Use Your Target Calendar
  • Kiosk
    • How to Set Up Kiosk Staff Working Hours
    • Overview of Kiosk Mode Functions
    • How to Create Agenda Screens for Your Kiosk Staff
    • Staff Member Types and Automated Task Allocation
    • How to Create Activity Screens for Your Staff
  • Quoting
    • The Four Levels of a Jobman Quote
    • How to Build Products
    • How to Create Styles and Range Options
    • How to Build Quote Presets
    • Quote Templates
    • Quote Statuses
    • How to Create and Send a Quote
    • How to Refresh Quote Pricing
    • How to Copy and Revise Quotes
    • How to Create, Send, and Sync Invoices
  • Catalogue Management and Inventory
    • Catalogue Settings
    • Setting Prices and Measurements for Catalogue Materials
    • How to Create and Import Catalogue Materials
    • How to Create Catalogue Services
    • How to Add and Manage Inventory Items (Stock)
    • Price Matrices
  • Purchase Ordering and Inventory Picking
    • How to Create Purchase Order Statuses
    • Managing Job Resource Materials
    • How to Create and Send Purchase Orders
    • How to Manage, Edit, and Receive Purchase Orders
    • Picking List and Inventory
    • How to Set Up Minimum Stock Quantities for Purchase Ordering
    • Supplier Integration – Hafele
    • Supplier Integration – Wilson & Bradley
  • Reporting
    • Reports in Jobman
    • Quote Summary Report
  • Job Alerts and Forms
    • How to Create and Use Job Alerts
    • How to Create and Use Job Forms
  • Payroll Set-Up and Time & Attendance
    • How to Set Up Staff Pay Rates
    • How to Log Staff Time and Attendance
    • How to Log Staff Leave, Public Holidays, and Temporary Business Shutdowns
  • CAD/CAM Integration
    • How to Connect Your CAD/CAM Software
    • Cabinet Vision
    • Mozaik
    • Microvellum
    • Winner Flex
Copyright 2025 Jobman Pty Ltd. All rights reserved.
Jobman AcademyJobman Academy
Sign inSign up

Sign in

Don’t have an account? Sign up
Lost your password?

Sign up

Already have an account? Sign in