


Back to: Complete Jobman Set-Up Guide for Administrators
Overview of Leads Tab
From the User Menu Panel on the left, click on Leads to view a list of all your leads:

- Use the search bars and/or the multi-select filters on the left to refine your lead search.
- Click into the lead you’re wanting to manage, and you will be redirected to the Lead Dashboard.
Lead Dashboard
The Dashboard gives you an overview of the lead number, job status, job type(s), contact name, and site address:

- Click on the lead status at any time to change it.
- Click Update to change the lead number and any other key details such as the contact, lead type(s), site address, etc.
- Use the 3-dot menu options to add lead members or additional contacts, or to delete the lead.
- Click New to create an invoice, item, job, or quote.
Further down the Dashboard, you will see the lead progress bar, Pending Tasks, Notes, and recent Activity:

Lead Info
The Info tab gives you a complete overview of the lead contacts, items, members, workflow, and any custom lead details you may have entered. You can edit this information at any time by clicking Update.

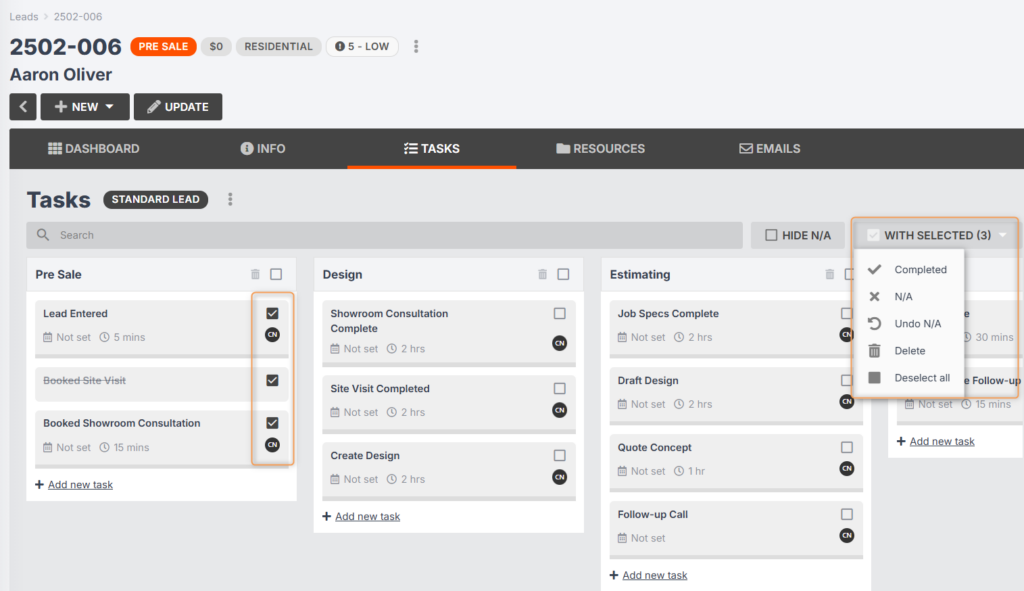
Lead Tasks
The Tasks tab shows you all the tasks contained in the lead workflow. Click on an individual task to view all its details, edit it, or mark it as complete. Click Add new task to add tasks to any step in the workflow.

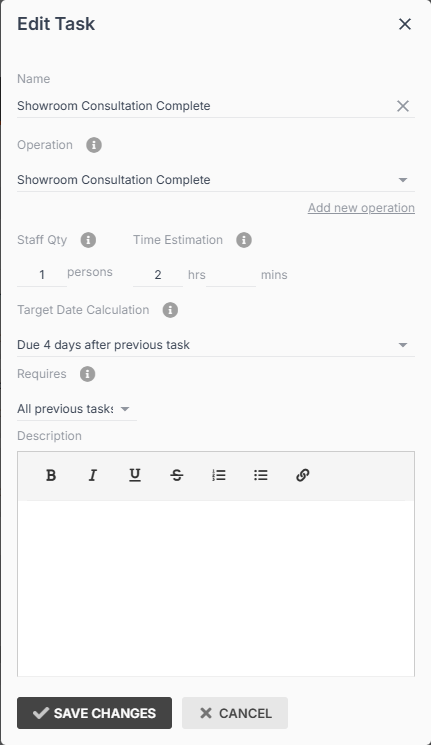
When you click on an individual task, a pop-up will appear containing the task details (see below). From here you can do any of the following:
- Start recording time against the task.
- Set the progress bar to a specific percentage.
- Mark the task as Complete.
- Mark the task as N/A.
- Browse any related files.
- Update the task details.
- Set a start date for the task.
- Set a target date for the task.
- Set a labour centre for the task.
- Assign members to the task.
- Delete the task if it is not required.

Lead Resources
The Resources tab allows you to view all the different notifications and documents (such as quotes, invoices, items, etc.) that are linked to the lead.

- Files – View, upload or remove files related to this lead.
- Invoices – View all invoices related to this lead.
- Items (also known as specifications) – View or create new items for the lead.
- Jobs – View all jobs generated from this lead.
- Quotes – View all quotes (including revisions) related to this lead.
Lead Emails
The Emails tab allows you to send and receive emails related to your lead. These might be internal emails between staff members, emails to external service providers, or emails sent directly to your client.
The Emails tab ensures that all correspondence relating to the lead is kept in one place. This means that designated staff can view the correspondence at any time, and the chain of communication is upheld even when key staff are on leave or reassigned elsewhere.

Adding More Than One Contact to a Lead
A lead will always originate from a single contact. However, once created, you can add contacts to an existing lead – such as installers, builders, or other service providers.
Note: this process is for external contacts, not your staff members.
Before you start:
- Make sure you have set up your contact roles.
- Add the organisation to your contacts if you haven’t already.
- Within the organisation’s contact page, add the relevant persons and their details.
Adding Contacts to a Lead
- Open your lead and click the 3-dot menu at the top-right (see below).
- Click Additional Contacts.
- A pop-up will appear, showing all current contacts. Click Add Contact.
- Choose the relevant Contact, Role, and Person.
You should now see the person you added in your lead under the Info tab.


Managing Lead Workflows
Once you have set up your workflows and created a lead, you can manage your workflows by following the below steps.
To view or change your workflow, go to Leads, click into a specific lead, then go to the Tasks tab.
Here is an example of a lead workflow broken up into its individual tasks:

Automation: When all tasks within a step have been completed or marked as N/A, your lead will automatically move into the next step. If the next step has a different status, the lead status will update automatically.
For example: If your last step has the status Job Won, then when the final task in that step is completed or marked N/A, the lead status will automatically update to Job Won.
Changing a Workflow
Your workflow, as shown above, is broken up into steps and tasks.
You can add new steps or tasks, delete tasks, or move your sections around by dragging and dropping them.
If you’ve amended a workflow within a lead and you want to save this as a new workflow to use in the future, click the 3-dot menu next to your workflow, then click Save as workflow, name the new workflow, and Save.
If you chose the wrong workflow when setting up your lead, you can change it by clicking the 3-dot menu next to your workflow, and select Change Workflow, then choose a new workflow from the drop-down, and click Change.

View or Update a Task:
Update multiple tasks: You can select the checkboxes next to as many tasks as you want, then use the With selected drop-down to either Complete, Mark as N/A, or Delete those tasks:
Update a single task: Click into the task you want to update, and you will see this window pop up:

From this window, you can perform any of the following actions:
- Update lead items
- Update lead details
- Update contact details
- Update operation details
- Update labour centre details
- Start the task
- Set progress (indicating what percentage of completion the task is up to)
- Mark the task Complete
- Mark the task N/A
- Upload/view Files
- Update the task itself, including: task name, operation, number of staff members required, duration, target date calculation settings, which other tasks are required for completion of this task, and task description.
- Set start date
- Set target date
- Set labour centre
- Lock target date
- Add members
- Delete the task