Skip to content
Jobman AcademyJobman Academy
  • Academy
  • My Account
Jobman AcademyJobman Academy
  • Academy
  • My Account

Supplier Integration – Hafele

Home » Supplier Integration – Hafele
Breadcrumb Abstract Shape

Supplier Integration – Hafele

  • February 21, 2025
  • Com 0

Back to: Complete Jobman Set-Up Guide for Administrators

0

Easily integrate with Hafele by connecting them to your Jobman organisation for faster and more accurate purchase ordering.

Please note: Supplier Integrations are an optional extra and must be added to your subscription before proceeding.

How to connect to Hafele

  1. Reach out to your Hafele sales representative to request your API credentials for connection to Jobman. This process may take a few days.
    Please note: Only Hafele sales representatives are aware of the process to follow. We do not recommend contacting Hafele directly, as they may not be familiar with what you’re requesting.These credentials are not the same as your normal Hafele site login. You must request specific API credentials from your Hafele sales representative.
  2. From the User Menu Panel in Jobman, go to Settings > Supplier Integrations > Hafele.
  3. Click Update and choose one of your contacts to represent Hafele in your Jobman organisation. This links any purchase orders or catalogue materials and services to this specific integration.
  4. Add the authentication details including username and password that were provided to you by Hafele in Step 1.

Note – Australian Customers: The Sales Organisation Code for Australia is AA01.

New Zealand Customers: The Sales Organisation Code for New Zealand is NZ01.

  1. Click Save Changes.
  2. Click Connect.
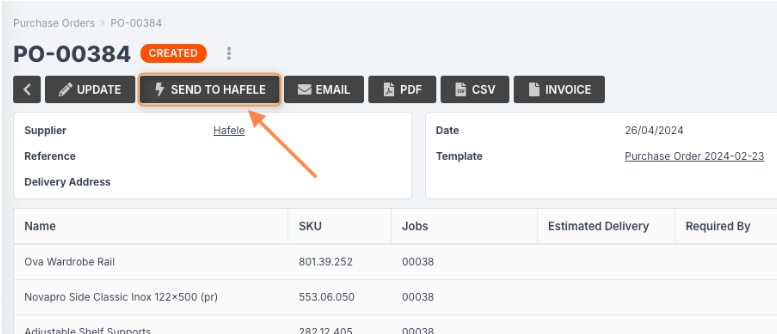
  3. Once connected, you should see that your Purchase Order CSVs for the contact that you specified are formatted to suit Hafele. And you should also now be able to send a purchase order directly to them.

Feature Explained: Send a Purchase Order Direct

Simply click Send to generate an order directly within the supplier’s system. No need for emailing back and forth, or waiting to receive an order number. Receive instant feedback on pricing, availability, and estimated delivery times.

If there are any issues with your order, an alert will be generated so that you can resolve the issue immediately.


Previous Lesson
How to Set Up Minimum Stock Quantities for Purchase Ordering
Lesson 6 within section Purchase Ordering and Inventory Picking.
Next Lesson
Supplier Integration – Wilson & Bradley
Lesson 8 within section Purchase Ordering and Inventory Picking.

Course Syllabus

  • General Navigation and Usability
    • General Navigation
    • User Control and User Settings
    • User Licenses and Staff Types
    • Staff Roles and Permissions
  • Getting Started
    • Connect to Your Cloud File Storage
    • Connect to Your Accounting Software
    • Setting Up Your Staff
    • Setting Up and Managing Staff Login Details
  • CRM Management
    • How to Add Contacts
    • How to Manage Contacts
    • Contact Types, Roles, and Sources
    • Contact Emails and Resources
  • Lead Management
    • What is a Lead?
    • How to Create a Lead Workflow
    • How to Create a Sales Labour Centre
    • How to Create an Agenda Screen for Your Sales Team
    • Lead Settings: Types and Statuses
    • Lead Settings: Details
    • Lead Settings: Members and Member Types
    • Create Lead Item Types and Specifications
    • Automated Triggers in Lead Workflows
    • How to Create a Lead
    • How to Manage and Edit a Lead
  • Job Management
    • How to Create a Job Workflow
    • Automated Triggers in Job Workflows 
    • Job Settings: Types, Statuses, Details, and Members
    • How to Create Labour Centres for Your Jobs
    • How to Create Agenda Screens for Your Jobs and Staff
    • Understanding Your Capacity
    • How to Create a Job
    • How to Manage and Edit a Job
    • How to Create a Work Order from a Job
    • How to Use Your Target Calendar
  • Kiosk
    • How to Set Up Kiosk Staff Working Hours
    • Overview of Kiosk Mode Functions
    • How to Create Agenda Screens for Your Kiosk Staff
    • Staff Member Types and Automated Task Allocation
    • How to Create Activity Screens for Your Staff
  • Quoting
    • The Four Levels of a Jobman Quote
    • How to Build Products
    • How to Create Styles and Range Options
    • How to Build Quote Presets
    • Quote Templates
    • Quote Statuses
    • How to Create and Send a Quote
    • How to Refresh Quote Pricing
    • How to Copy and Revise Quotes
    • How to Create, Send, and Sync Invoices
  • Catalogue Management and Inventory
    • Catalogue Settings
    • Setting Prices and Measurements for Catalogue Materials
    • How to Create and Import Catalogue Materials
    • How to Create Catalogue Services
    • How to Add and Manage Inventory Items (Stock)
    • Price Matrices
  • Purchase Ordering and Inventory Picking
    • How to Create Purchase Order Statuses
    • Managing Job Resource Materials
    • How to Create and Send Purchase Orders
    • How to Manage, Edit, and Receive Purchase Orders
    • Picking List and Inventory
    • How to Set Up Minimum Stock Quantities for Purchase Ordering
    • Supplier Integration – Hafele
    • Supplier Integration – Wilson & Bradley
  • Reporting
    • Reports in Jobman
    • Quote Summary Report
  • Job Alerts and Forms
    • How to Create and Use Job Alerts
    • How to Create and Use Job Forms
  • Payroll Set-Up and Time & Attendance
    • How to Set Up Staff Pay Rates
    • How to Log Staff Time and Attendance
    • How to Log Staff Leave, Public Holidays, and Temporary Business Shutdowns
  • CAD/CAM Integration
    • How to Connect Your CAD/CAM Software
    • Cabinet Vision
    • Mozaik
    • Microvellum
    • Winner Flex
Copyright 2025 Jobman Pty Ltd. All rights reserved.
Jobman AcademyJobman Academy
Sign inSign up

Sign in

Don’t have an account? Sign up
Lost your password?

Sign up

Already have an account? Sign in